
Complete Guide to Choosing and Using a Power Rack with Leg Press
Overview: What a Power Rack with Leg Press Offers and Who Benefits
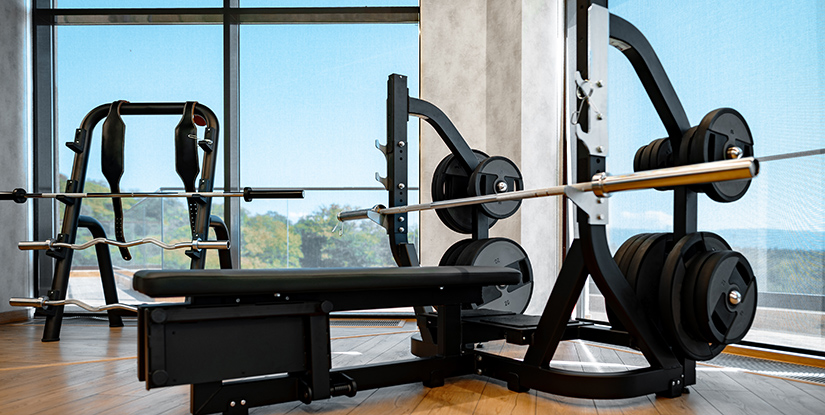
A power rack with leg press attachment combines the safety and versatility of a traditional power rack (also called a squat rack or power cage) with the horizontal pressing mechanics of a leg press machine. For athletes, strength coaches, physical therapists, and home lifters, this hybrid equipment delivers compound-squad training plus unilateral and isolation options within a compact footprint. Typical commercial-grade units have load capacities ranging from 700 to 1,500 lbs (318–680 kg) and footprints that vary from 48" x 48" (122 x 122 cm) to larger 80" x 60" (203 x 152 cm) setups once the leg press carriage is added.
Real-world applications include:
- Sports performance centers that need heavy compound load capability for squats and presses while also offering leg isolation without a separate machine.
- Home gyms where space is limited but training variety is essential—one rack can become a squat, bench, pull-up, landmine, and leg press station.
- Rehabilitation clinics using controlled leg press angles to progress patients from partial to full range of motion with adjustable resistance and spotter safety.
Key benefits supported by recent industry trends: the global strength equipment market has grown steadily, with free-weight and hybrid rack systems accounting for an increasing share of commercial installs due to their flexibility and ROI. For lifters focused on hypertrophy and strength, adding a leg press to a power rack increases training density—athletes can perform eight to 12 sets of varied leg movements in less transition time.
Practical tips for assessing value:
- Clarify training goals (max strength vs. hypertrophy vs. rehabilitation).
- Measure your available space, including clearance for a leg press carriage travel (typically 36"–48" additional length).
- Confirm weight capacity and compatibility with standard or Olympic plates (2" center hole normal for Olympic).
Design Variations, Attachments, and Typical Specifications
Power racks with leg press attachments come in several designs: bolt-together commercial rails, welded frames with integrated carriages, and modular systems where the leg press can pivot away to save space. Common specifications to compare include:
- Frame material and gauge: 11–7 gauge steel is common in commercial units; home racks often use 12–14 gauge.
- Hole spacing: 1" vs. 2" increments—1" offers finer adjustment for safeties and J-cups.
- Carriage travel and angle: many leg press attachments use a 30°–45° incline or near-horizontal sleds; 30° is common for combining load with manageable spine compression.
- Weight capacity and plate setup: confirm if the leg press uses independent sled loading (plates on carriage) or cable-assist with stack weights.
Example: A commercial rack with a welded 11-gauge frame, 1" hole spacing, and a 45" leg press carriage rated at 1,200 lbs offers both heavy loading and precise J-cup placement for varied barbell movements.
Who Should Invest in a Power Rack with Leg Press?
Prioritize this purchase if you are one of the following:
- Strength athletes who need high-load squats and want additional unilateral leg capacity for accessory work.
- Gym owners maximizing equipment versatility and member throughput—one piece reduces the need for a separate leg press machine.
- Rehab professionals requiring progressive resistance with built-in safety rails for clients returning from knee or hip injury.
Case example: A small commercial gym replaced a standalone leg press with an integrated leg press rack system and reported a 20% increase in throughput during peak hours because members spent less time switching between stations.
Buying Guide: How to Choose the Right Power Rack with Leg Press
Selecting the right model requires balancing budget, space, load requirements, and desired training features. Start by listing must-haves (weight capacity, hole spacing, bench compatibility) and nice-to-haves (pulley systems, landmine, dip attachment). Price ranges vary: economy home models start around $500–$900, mid-range modular racks $900–$2,000, and premium commercial systems $2,500–$7,000+ depending on fabrication and included attachments.
Step-by-step selection process:
- Measure your room: account for vertical clearance (allow 8–10 ft / 2.4–3 m), carriage travel area, and doorframe widths for delivery.
- Define maximum load: if you plan heavy Olympic lifts or powerlifting, choose at least 1,000 lb capacity; for general fitness, 700–900 lb is adequate.
- Assess modularity: ensure the leg press carriage can be removed or folded if you need floor space for conditioning work.
- Verify attachment compatibility: bench, lat pulldown, and cable systems expand functionality—confirm pin sizes and mounting points.
- Read user reviews for long-term durability issues such as carriage wobble, weld fatigue, or coating chipping.
Practical checklist when comparing models:
- Hole spacing and number of holes—impacts J-cup placement and safety rail options.
- Sled bearing type—roller bearings improve smoothness; sleeve bearings are lower cost but can wear faster.
- Warranty coverage—look for at least 5 years on frames and 1–3 years on moving parts for home use; commercial warranties should be longer.
- Assembly and delivery—confirm if curbside delivery is included and whether professional installation is recommended.
Cost-Benefit and ROI for Gyms and Home Users
Calculate ROI by estimating member time saved, space reclaimed, and equipment versatility. For gyms, one multi-use rack can replace multiple single-use machines, saving on floor space and initial outlay. Example ROI calculation: a gym that replaces a $3,000 leg press and $2,000 squat rack with a $4,500 integrated rack saves $500 upfront and reduces footprint by ~50%. Over five years, reduced maintenance and higher member satisfaction can outweigh the initial cost.
Home buyers should weigh frequency of use. If you train legs 2–3x/week and lift heavy, the convenience and safety of a leg press attachment justify the higher cost. For occasional users, a basic power rack plus separate glute/ham raises or dumbbell alternatives may be more economical.
Warranty, Maintenance, and Safety Certification
Before purchase, confirm manufacturer certifications (ASTM or EN standards where applicable) and check whether warranties cover commercial use if you’re a gym owner. Maintenance considerations include periodic lubrication of sled bearings, inspection of welds and bolts every 3–6 months, and replacing worn straps or pulleys as needed. For safety, ensure the rack includes adjustable safeties, secure J-cups, and a leg press stop/lock mechanism to prevent carriage runaway.
Programming, Setup, and Safe Use: Practical Training and Installation
Integrating a power rack with leg press into programming requires clear progression plans and rigging for safety. Common training splits use the rack for primary compound lifts (squat, bench, deadlift variations) and the leg press for high-volume accessory work. A typical microcycle example for a strength-focused lifter:
- Day 1: Heavy squat sets (3–5 sets of 3–5 reps), followed by leg press volume (4 sets of 10–12 reps at 60–70% 1RM equivalent).
- Day 2: Upper-body push/pull with bench in-rack and accessory sled pushes or reverse sled pulls.
- Day 3: Deadlift or hinge variations outside the rack, single-leg leg press sets or split squats for unilateral balance.
Step-by-step setup for a safe leg press session:
- Inspect the carriage and locking pin; ensure smooth travel and secure retention points.
- Load plates evenly and use collars if plates are free on a carriage sleeve.
- Set backrest/footplate angle and adjust range-of-motion stops to match training goals and client mobility.
- Perform a controlled warm-up: dynamic hip and ankle mobility and two warm-up sets at 40% and 60% working weight.
- Use slow eccentric control and avoid full lumbar rounding by maintaining a neutral spine or using a controlled incline angle.
Safety best practices:
- Always use safeties or locking pins—do not rely solely on spotters for maximal sets.
- For rehabilitation, reduce angle and range of motion; begin with 10–20% bodyweight and progress in 5–10% increments weekly based on pain-free ROM.
- Monitor knee valgus and adjust foot position to reduce shear forces—wider stance or external rotation can change activation patterns.
Technique Cues and Common Programming Mistakes
Technique cues for leg press execution: maintain feet mid-plate to target quads; move feet higher to shift load to glutes and hamstrings; avoid locking knees at the top of the movement. Common programming mistakes include using excessively heavy loads that create compensatory lumbar extension, neglecting unilateral work (single-leg presses or Bulgarian split squats), and over-relying on the leg press at the expense of loaded squats. Balance is key—use the leg press to add volume without overloading the central nervous system.
Case Study: From Rehab to Performance
A 34-year-old client with a post-ACL reconstruction program used an integrated leg press to progress from partial range-of-motion isometrics to full-range concentric-eccentric control. Over a 12-week protocol, clinicians progressed load from bodyweight-assisted carriage to 70% of contralateral strength by week 8, with objective metrics improving: single-leg hop distance increased 18%, and patient-reported pain decreased to near zero. The integrated rack allowed quick transitions to squats and step-ups in the same area, preserving continuity of care.
Maintenance, Installation, Case Studies, and FAQs
Proper maintenance and correct installation extend lifespan and reduce downtime. For installation, common recommendations include bolting the rack to a level concrete or reinforced floor for commercial units, and ensuring 8–10 ft ceiling clearance. Use a torque wrench for bolts, and follow manufacturer torque charts. For home installations on wood floors, use thick rubber matting and consider floor anchors designed to distribute load.
Routine Maintenance and Troubleshooting
Maintenance tasks and frequencies:
- Monthly: Inspect bolts, welding seams, and hardware; tighten J-cups and safeties; check carriage travel for debris.
- Quarterly: Lubricate sled bearings and rails per manufacturer guidance; inspect pulleys and cables if cable-assist systems are present.
- Annually: Deep clean powder-coat surfaces, inspect weld integrity, and replace worn bushings or straps.
Troubleshooting common issues: carriage wobble usually indicates worn bearings or loose bolts—tighten and replace bushings. Rust on contact points can be mitigated with light sanding and a rust-inhibiting touch-up paint. For persistent alignment problems, contact manufacturer support and reference serial numbers for part replacement.
Installation Case Study and Space Optimization
A boutique gym with a 600 sq ft training area replaced a standalone leg press and free rack with three modular racks each featuring leg press attachments. The gym optimized space by orienting racks back-to-back along a central aisle, enabling six concurrent users in the same footprint previously used by four machines. Member surveys showed a 14% increase in satisfaction due to faster transitions and greater exercise variety. Important installation lessons included verifying floor flatness and routing bench placement for unobstructed bench-to-rack movement.
Below are 11 professional FAQs addressing common technical, safety, and programming concerns associated with a power rack with leg press. Each answer is concise and actionable for coaches, gym managers, and home trainers.
- How much floor space do I need? Allow for the rack footprint plus carriage travel—typical minimum: 6 ft x 6 ft (1.8 x 1.8 m) and 3–4 ft of extra length for leg press travel.
- Can the leg press attachment handle Olympic plates? Most commercial attachments accept Olympic 2" sleeves; verify sleeve diameter and confirm maximum plate load per carriage.
- Is the leg press safe for rehab clients? Yes, when used with controlled ROM, appropriate load progression, and lockable stops to prevent carriage runaway.
- How often should bearings and bushings be serviced? Inspect monthly; lubricate and replace worn components quarterly to annually depending on usage intensity.
- Do I need a separate membership tier for access? Not necessary—consider scheduling peak times and providing orientation sessions to ensure safe usage.
- What is the best angle for a leg press carriage? Angles between 30°–45° balance load and spinal compression; clinicians often prefer lower inclines for reduced shear.
- Can a power rack with leg press replace squats entirely? No—leg press is a valuable accessory but doesn’t fully replicate the core stabilization and proprioceptive demands of free-weight squats.
- How should I progress load for hypertrophy? Increase volume (sets/reps) before load once technique is stable—typical progression: add 5–10% load every 1–2 weeks if form and fatigue allow.
- Are there specific safety certifications to look for? Look for ASTM or relevant regional standards and check whether the unit is rated for commercial use if intended for gym settings.
- How do I avoid lower-back strain on the leg press? Maintain a neutral lumbar position, avoid excessive range of motion that causes posterior pelvic tilt, and adjust foot placement to reduce hip flexion stress.
- What attachments most increase ROI? Lat pulldown, landmine, and dip stations expand exercise variety and member value without requiring additional machines.