
Rack Mounted Leg Press: Complete Guide to Selection, Installation, Programming, and Safety
Introduction: Why Choose a Rack Mounted Leg Press and Its Key Benefits
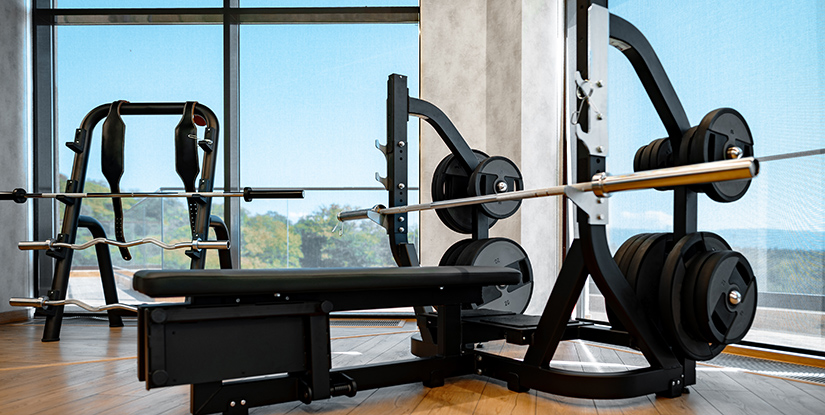
The rack mounted leg press is an increasingly popular solution for gyms, strength coaches, and serious home lifters who need a compact, heavy-duty machine for lower-body development. Unlike free-weight alternatives, a rack-mounted unit integrates into a power rack or rig, saving floor space while delivering high load capacity and controlled movement paths. Typical commercial models support load capacities between 1,000 and 2,000 lbs (450–900 kg), making them suitable for powerlifting, athletic training, and hypertrophy programs.
Practical benefits include:
- Space efficiency: mounts inside or adjacent to an existing rack, reducing footprint compared to dedicated leg press frames.
- Load versatility: accepts Olympic plates, and many designs are compatible with plate storage to facilitate quick weight changes.
- Safety and control: fixed plane of motion decreases compensatory movement, which is beneficial for rehab and coached technique work.
- Cost-effectiveness: a rack-mounted solution can be less expensive than a full sled-style leg press while offering heavier loading possibilities.
Real-world use cases show commercial CrossFit-style boxes and university athletic departments adopting rack-mounted presses to expand lower-body training options without acquiring additional large equipment. For example, a collegiate strength room of 30 athletes found that adding two rack-mounted leg presses increased lower-body training throughput by 25% because athletes could work in parallel without waiting for a dedicated leg press machine.
Key performance metrics and expectations:
- Range of motion: most units provide 60–120 cm of linear travel, adjustable via seat or sled position.
- Loading increments: using 20 kg (45 lb) plates offers clear progression steps; micro-loading with 1.25–2.5 kg plates is recommended for advanced lifters.
- Programming outcomes: expect strength gains of 8–15% in 8–12 week mesocycles when combined with squat variations and progressive overload.
Practical Tips for Assessing Suitability and ROI
Before purchasing, perform a short needs analysis: count peak daily users, measure rack real estate, and estimate weekly sessions that would include the press. Prioritize units with adjustable footplate angles and multiple sled positions for programming versatility—these features increase ROI by enabling both single-leg and bilateral protocols. For home gyms, ensure ceiling clearance and rack depth allow full sled travel; many compact systems require a minimum rack depth of 48–60 inches (120–150 cm).
Budget considerations: a commercial-grade rack-mounted leg press ranges widely—budget models may start around $600–$900, while heavy commercial units exceed $2,000. Factor in labor for installation and potential modifications to the rack. Include warranties and specify weld integrity and plate-loading capacity in procurement documents to prevent premature wear in high-use environments.
Choosing and Installing a Rack Mounted Leg Press: Specs, Measurements, and Step-by-Step Setup
Choosing the right rack mounted leg press starts with detailed specifications and a site survey. Key measurements include rack width, depth, upright spacing, and floor type. Most rack-mounted presses require at least a 2x3 or 3x3 upright spacing pattern and a minimum rack depth of 48 inches (122 cm). Confirm compatibility with your rack's hole spacing (typically 1-inch PCD) and attachment hardware. Load capacity should exceed anticipated peak loads by 20–30%—for a strength program with lifters benching 500 lbs equivalent leg loads, specify 1,500–2,000 lbs capacity.
Installation checklist (step-by-step):
- Step 1 — Inspect rack and space: verify upright gauge, safety strap anchors, and floor condition. Measure ceiling height and confirm sled travel clearance.
- Step 2 — Unpack and inventory parts: check sled, rails, mounting brackets, fasteners, bushings, and instructions. Identify rated hardware and any specialized tools required.
- Step 3 — Attach mounting brackets: align with pre-drilled holes and use manufacturer-specified bolts. Use lock washers or thread-locker per spec. If your rack uses captive nuts, ensure orientation allows smooth sled insertion/extraction.
- Step 4 — Install sled and test travel: with safety pins in place, slide the sled and test full-range motion without plates. Check for binding at multiple points of travel.
- Step 5 — Load test and adjust: progressively add plates up to 25–30% of maximal expected load and re-check for structural flex or unusual noises. If floor anchors are required, use recommended anchor sizes and torque values indicated by the manufacturer.
Best practices for installation and site safety:
- Always follow the manufacturer's torque recommendations; where unspecified, consult a certified technician.
- Install in a high-traffic-aware zone—place signage indicating the machine's intended use and maximum load rating.
- Make anti-rotation and shear checks: under heavy loads, racks can experience lateral stress. Adding cross-bracing or anchor points mitigates risk.
- Document the installation: capture photos, serial numbers, and completion dates for warranty and maintenance records.
Common Installation Pitfalls and Solutions
Three recurring issues arise during installation: inadequate rack compatibility, sled binding, and insufficient floor support. To avoid compatibility problems, request CAD drawings or dimensional templates from manufacturers prior to purchase. For binding, check bushing alignment and apply recommended lubricant; replace worn bushings with OEM parts. When floors are not reinforced, distribute loads using a base plate or structural timber shim; for commercial facilities, consult a structural engineer if anchor loads might transmit to subfloor elements. These steps minimize downtime and ensure safety compliance for high-use environments.
Programming, Safety, Maintenance, and Case Studies for Rack Mounted Leg Press
Programming a rack mounted leg press requires integration with compound lifts like squats and deadlifts. Use the device for targeted hypertrophy, heavy triples, or controlled eccentric work. Standard programming templates:
- Strength block: 3–6 sets of 3–6 reps at 85–95% 1RM equivalent; focus on slow, controlled concentric drives.
- Hypertrophy block: 3–5 sets of 8–12 reps at 65–80% intensity, with 60–90 seconds rest.
- Endurance/rehab: 2–4 sets of 15–20 reps at 40–60% for metabolic work or early-stage rehab.
Actionable progressions and programming tips:
- Linear progression: add 2.5–5 kg per session for micro-loading once rep targets are met.
- Tempo manipulation: emphasize a 3–4 second eccentric to increase time under tension for hypertrophy.
- Single-leg variations: offset foot placement on the plate to isolate quadriceps or glutes, using lighter loads and higher reps initially to establish balance.
Safety protocols and maintenance best practices are essential. Require a pre-use inspection checklist that includes bushing integrity, weld cracks, fastener tightness, and sled wheel wear. In commercial settings, perform monthly full inspections and daily quick checks. Lubrication intervals depend on use; heavy commercial use calls for weekly lubrication of sliding interfaces and quarterly replacement of high-wear bushings.
Case study 1 — Collegiate Strength Program: Over a 12-week cycle, a university strength coach implemented rack-mounted leg press sessions twice weekly for 40 athletes (in rotation). Outcomes: average 10% increase in vertical jump measured via force plate testing and a 12% increase in leg press 3RM. The program paired leg press days with dynamic warm-ups and posterior chain activation to avoid overloading the spine on consecutive squat days.
Case study 2 — Rehabilitation Clinic: A sports medicine clinic used a rack-mounted unit to control knee flexion angles for ACL early-stage rehab. Controlled, submaximal eccentric loading at 40–60% restored quadriceps activation without provoking joint effusion. Clinicians reported improved patient adherence due to the device's perceived safety and comfort.
Maintenance Checklist and Troubleshooting Guide
Monthly maintenance checklist:
- Inspect welds for hairline cracks; repair per manufacturer's guidance.
- Check and tighten all bolts and mounting hardware.
- Replace bushings or rollers showing >25% wear or increased play.
- Lubricate rails and slide surfaces with dry-film lubricant to minimize dust buildup.
- Record usage volume to forecast part replacements—e.g., high-use commercial units may require roller replacement every 12–18 months.
Troubleshooting tips: If the sled pulls to one side, verify bracket alignment and swap rollers to isolate a worn component. If excessive noise occurs under load, inspect for loose plates, damaged bearings, or debris in the rail. Always remove heavy loads before performing maintenance and follow lockout/tagout procedures in commercial settings.
FAQs
- Q1: Is a rack mounted leg press safe for novice lifters? A1: Yes—when introduced with supervision and appropriate load progression. Begin with bodyweight or light plate loading and emphasize controlled range of motion and foot placement.
- Q2: Can a rack mounted leg press replace squats? A2: No—it's complementary. Leg press isolates lower limbs and reduces spinal loading but lacks the full-body stabilization demand of squats.
- Q3: What is the ideal foot placement? A3: Mid-plate placement emphasizes quadriceps; higher placement shifts load to glutes and hamstrings. Adjust based on goals and joint comfort.
- Q4: How often should I lubricate rails? A4: For heavy commercial use: weekly. For moderate home use: monthly. Use manufacturer-recommended lubricants.
- Q5: What are common load capacity standards? A5: Commercial units typically rate 1,000–2,000 lbs. Confirm the specific model rating before heavy loading.
- Q6: Can I perform single-leg presses? A6: Yes—ensure reduced loads and stable rack mounting. Single-leg work improves unilateral strength and corrects imbalances.
- Q7: How to test installation integrity? A7: Conduct incremental load testing, inspect for deflection, and document results. If uncertain, consult a structural engineer.
- Q8: Are there mobility limitations to consider? A8: Yes—ankle dorsiflexion and hip mobility affect foot placement and knee tracking. Modify range of motion to maintain safe joint alignment.
- Q9: What maintenance parts should I stock? A9: Spare bushings/rollers, mounting bolts, anti-rotation pins, and a tube of recommended lubricant.
- Q10: Is professional installation necessary? A10: For commercial installs or where floor anchoring is required, use certified technicians. Home installations can be DIY if following manufacturer instructions and safety checks.
- Q11: How does the rack mounted leg press impact programming frequency? A11: It can increase lower-body training frequency by allowing redistributing of intensity—use it for supplemental heavy or volume days while keeping primary squat days fresh.
- Q12: What safety gear should users employ? A12: Use lifting shoes for stable foot contact, knee sleeves if prescribed, and ensure spot protocols or safety pins are in place for untrained users.