
Straight Rope Pulldown: Equipment Guide, Technique, and Programming
Introduction to the Straight Rope Pulldown
The straight rope pulldown is a cable-based exercise that combines the benefits of a cable machine with a simple rope attachment to deliver consistent tension through a full range of motion. Often used as a lat-focused exercise, it also engages the mid-back, rear deltoids, and arms depending on grip and execution. Unlike a fixed bar, a rope allows a natural pronation and separation of the hands at the bottom of the movement, encouraging scapular depression and greater range of motion while maintaining continuous load throughout the eccentric and concentric phases.
Beyond basic definitions, the straight rope pulldown is popular in both commercial gyms and home setups because of its versatility. It adapts well to different training goals—hypertrophy, strength, endurance, or rehabilitation—by adjusting load, tempo, and grip. The exercise’s cable-based resistance differs from free-weight pulls in that it provides a consistent line of pull, minimizing momentum and encouraging controlled muscular engagement. Properly integrated, the straight rope pulldown can complement compound lifts like weighted pull-ups and rows, adding focused stimulus to the latissimus dorsi and scapular stabilizers.
When introducing the straight rope pulldown into a program, it is important to consider the equipment available, the rope attachment characteristics, and the trainee’s biomechanical needs. Small changes—such as the height of the pulley or the choice between a straight rope and angled rope—significantly affect muscle emphasis and joint stress. This section provides context for subsequent detailed guidance on equipment selection, technique, variations, and programming so practitioners can apply the exercise safely and effectively.
What is the straight rope pulldown?
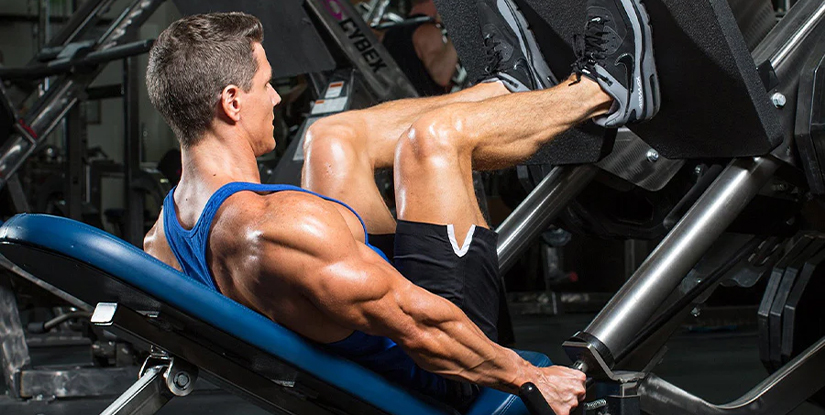
The straight rope pulldown uses a rope attachment connected to a high pulley on a cable machine. The trainee sits facing the machine (or stands, depending on variation), grips the rope, and pulls it down toward the chest or upper abdomen. Unlike a straight bar that fixes wrist position, the rope allows the hands to move independently at the bottom, creating a more natural scapular depression and improved lat engagement. The exercise is frequently recommended as an accessory movement to target the lower and outer aspects of the latissimus dorsi and to improve scapular control.
Because the rope separates at the finish, trainees can flare their elbows slightly and squeeze the shoulder blades down and together, which emphasizes the lower lats and reduces overuse of the biceps. The straight rope pulldown is also scalable: reducing weight and focusing on tempo makes it an excellent choice for technique work, whereas heavier sets with controlled eccentric phases increase time under tension for hypertrophy. The cable’s constant tension ensures no slack at the top of the movement, promoting muscle engagement across the entire range.
Muscles targeted and biomechanics
Primary muscles engaged by the straight rope pulldown include the latissimus dorsi (especially its lower and lateral fibers), the teres major, and the posterior fibers of the deltoid. Secondary muscles include the rhomboids and middle trapezius for scapular retraction, the rotator cuff group for stabilization, and the biceps brachii and brachialis to a lesser extent during elbow flexion. The separation of the rope at the bottom encourages scapular depression and reduces excessive shoulder elevation, targeting the lat's lower insertion more effectively than a rigid bar.
Biomechanically, the straight rope pulldown creates a line of pull that remains consistent with gravity as the hands travel down. This means the moment arm at the shoulder changes less dramatically than in some free-weight rowing variations, allowing sustained tension. Proper scapular motion is crucial: a controlled scapular retraction and depression before initiating elbow flexion optimizes muscular recruitment and decreases shoulder impingement risk. Adjusting wrist angle and hand separation further shifts emphasis between lats and upper back musculature—wider hand separation and greater elbow flare accentuate the lats, while narrower pulls increase biceps involvement.
Choosing and Setting Up Equipment
Choosing the right equipment sets the foundation for an effective and safe straight rope pulldown. Components to consider include the type and length of the rope, the quality and diameter of grips, the pulley height and alignment, and the machine’s weight stack increments. For most trainees, a 14–18 inch braided rope with solid metal crimps and durable nylon webbing works well. Softer ropes with rubberized handles improve comfort and reduce hand fatigue, whereas heavier-braided ropes provide a firmer feel and less stretch under load.
The cable pulley should be smooth and properly lubricated to ensure consistent tension; wobble, stickiness, or a misaligned pulley undermines movement quality. Look for machines with adjustable knee pads or thigh anchors to stabilize the lower body when performing seated pulldowns to prevent the trainee from lifting off the bench and using momentum. Also consider the machine’s maximum and minimum height settings—if the cable’s top anchor sits too high relative to shoulder height, it can alter the pull angle and reduce effectiveness.
In addition to hardware, accessory choices impact outcomes. Some gyms offer straight rope attachments with various end fittings: carabiner snaps, swivel ends, or fixed rings. Swivels reduce twisting forces on the cable and make hand separation smoother. If you’re training at home with a pulley system attached to a rig or ceiling mount, ensure the anchor points are rated for dynamic loads and that the rope’s connectors are secured with locking carabiners to minimize the chance of equipment failure.
Types of ropes and attachments
Rope attachments vary by diameter, material, and handle design. Thicker diameter ropes (about 1" or more) force a stronger grip and slightly change forearm recruitment; thinner ropes are easier on the hands but shift more stress to the lats and biceps. Materials include braided nylon, polypropylene, and leather-wrapped options—each has pros and cons related to grip comfort, durability, and stretch. For regular heavy training, braided nylon with reinforced ends provides a good balance of durability and comfort.
Attachment hardware matters too. A rotating carabiner or swivel reduces cable twist and prevents chafing, preserving both rope and cable longevity. Some ropes include rubber stoppers or molded grips near the ends to provide consistent hand placement. For specialized uses—like triceps pushdowns versus lat pulldowns—different rope lengths and end configurations are available. When selecting, prioritize safety certifications, secure crimps, and minimal abrasion points to prolong usable life and reduce maintenance frequency.
Cable machine setup and safety considerations
Proper setup includes adjusting the pulley height and seat to create an optimal line of pull. For seated straight rope pulldowns, the pulley should be positioned high enough so the cable travels almost vertically downward to the hands. The seat height must allow the thighs to be firmly anchored under the pads so the lifter cannot rise during heavy pulls. Confirm that the weight stack is securely seated and that selector pins are fully inserted to avoid sudden weight drops. Inspect the cable for fraying and test with a few light reps before increasing load.
Safety precautions include checking the integrity of all attachment points, using gloves or chalk if grip slippage is a concern, and warming up with lighter sets or dynamic shoulder and scapular drills. When training alone, avoid excessive loads that force the use of momentum or unsafe body positions. For those with shoulder history, initial sets at submaximal loads with slow eccentric control and prehab movements are recommended. Lastly, ensure the training area is clear and that bystanders understand not to touch moving weights or cables during exercise execution.
Technique and Variations
Technique determines whether the straight rope pulldown effectively targets the intended muscles and minimizes injury risk. Good technique emphasizes scapular control, smooth tension throughout the movement, and a deliberate finish where the hands separate and the elbows drive down toward the torso. Common coaching cues include 'belt buckle to chest,' 'scapula down and back,' and 'control the eccentric for two to three seconds.' The key is to initiate the movement with scapular retraction and depression before allowing elbow flexion to complete the pull.
Alignment and posture are crucial: maintain a neutral spine with a slight backward lean (about 10–20 degrees) to create a stable trunk without using lumbar hyperextension. Avoid shrugging the shoulders upward; this shifts load to the traps and reduces lat activation. Breathing should be coordinated—inhale at the top, brace the core, and exhale during the concentric pull as you actively drive the elbows down. Using a full but controlled range of motion enhances muscle fiber recruitment and improves mobility over time.
Variations expand the exercise’s utility. Standing straight rope pulldowns mimic cable pullover mechanics and can emphasize different lat fibers; single-arm rope pulldowns correct imbalances and improve unilateral strength; tempo variations modify metabolic and neural stress for hypertrophy or endurance. Choosing a variation should align with training goals and current movement competency.
Proper form: step-by-step guide for straight rope pulldown
Step 1: Set up the seat and knee pads so the thighs are securely anchored. Adjust the pulley to a high position where the cable travels almost vertically. Step 2: Grip the rope with a neutral wrist position (palms facing each other) and sit tall with a slight lean back from the hips. Maintain a neutral spine and engage the core. Step 3: Initiate the movement by drawing the scapulae down and together—think of pulling the shoulder blades toward the pelvis before the elbows move. This scapular set primes the lats and reduces trap dominance.
Step 4: Pull the rope down by driving the elbows toward your sides and slightly back. At the bottom of the movement, focus on separating the rope ends, allowing the hands to move slightly apart and toward the hips or upper abdomen depending on range. Squeeze the lats at the finish for one second to ensure maximal contraction. Step 5: Return the rope slowly under control, allowing the shoulders to fully re-elevate while resisting the weight on the eccentric for a 2–3 second count. Avoid letting the weight slam into the stack and maintain scapular control through the return.
Common variations and progressions
Single-arm straight rope pulldown: Attach a single handle to the high pulley and perform unilateral pulls. This corrects imbalances and trains core anti-rotation. Tempo and eccentric focus: Slow the eccentric to 3–4 seconds per rep to increase time under tension and stimulate hypertrophy. Pause reps: At the bottom, hold the contraction for a 1–2 second isometric squeeze to reinforce neuromuscular connection and scapular control.
Reverse-grip rope pulldown: With palms facing up, the exercise shifts more emphasis to the lower lats and biceps—useful for those wanting more arm involvement. Standing rope pulldown to hip: Adjust pulley slightly higher and perform the movement from standing, finishing with the rope toward the hip to emphasize different lat fibers. For strength progression, use heavier weights with lower reps (4–6), but ensure perfect form; for hypertrophy, use 8–12 reps with controlled eccentrics. Use progressive overload via added weight or increased time under tension depending on goals.
Programming and Workout Integration
The straight rope pulldown can play different roles in a training program: primary back movement for lat emphasis, accessory for upper body pulling strength, or a corrective exercise for shoulder health. Program placement depends on goals—place it early in a session if the objective is focused lat work, or later as an accessory to pre-exhaust or add supplemental volume. Balance the pulldown with horizontal pulls (rows) and vertical pulls (pull-ups) to ensure comprehensive back development and joint health.
Periodization matters. For hypertrophy phases, emphasize moderate loads (65–80% 1RM equivalent) for 8–15 reps across 3–5 sets, using tempo manipulation to increase time under tension. Strength phases prioritize heavier loads, lower reps (3–6), and longer rest intervals. Endurance or conditioning blocks can include higher rep ranges (15–25) with shorter rest. Track volume (sets × reps × load) and progressively increase either weight, reps, or set count every 1–3 weeks to drive adaptation while monitoring recovery.
Integrate warm-up sets and pairing strategies: perform lighter activation sets before heavy compound lifts or superset with antagonists like chest presses for metabolic balance. Include mobility work for the thoracic spine and scapular upward rotation to enhance pulldown mechanics. Finally, modify frequency based on recovery—most trainees benefit from 2–3 lat-focused sessions per week, with 6–12 total sets per week for hypertrophy and 8–16 for strength-oriented individuals distributed across sessions.
Rep schemes, load management, and periodization
Load selection and rep schemes should align with short-term training blocks. For hypertrophy, 3–5 sets of 8–12 reps at 65–80% perceived max with controlled 2–3 second eccentrics are effective. If the goal is strength, structure sessions with 3–5 sets of 3–6 reps at heavier loads, emphasizing explosive concentric pulls and controlled eccentrics. For muscular endurance or conditioning, apply 2–4 sets of 15–25 reps using lighter loads and short rests to raise metabolic stress without compromising form.
Periodize by alternating focus every 4–8 weeks: a hypertrophy block followed by a strength block and then a deload week. Use autoregulation strategies such as rate of perceived exertion (RPE) to adjust load when daily readiness fluctuates. Track volume and intensity to avoid overtraining: a practical rule is to increase weekly volume by no more than 10% and include deloads every 4–12 weeks based on fatigue and performance markers.
Sample workouts for strength, hypertrophy, and endurance
Strength-focused session: Warm-up with banded scapular pulls, then 4 sets of 4–6 reps straight rope pulldown at challenging loads with 2–3 minutes rest. Pair with heavy bent-over rows and heavy deadlift variations for posterior chain integration. Hypertrophy session: After a general warm-up, perform 4 sets of 8–12 reps straight rope pulldown with a 3-second eccentric and 60–90 seconds rest; follow with seated cable rows and face pulls to balance scapular mechanics. Endurance/conditioning session: Use 3 sets of 15–20 reps with light-moderate load, 30–45 seconds rest between sets, combined with circuits that include bodyweight rows and kettlebell swings for metabolic conditioning.
Adjust the number of total sets per week depending on goals: aim for 6–12 total sets weekly for hypertrophy and 8–16 for strength, divided across 2–3 sessions. Monitor technique closely when increasing frequency; form breakdown is a primary indicator to reduce load or volume. Use these templates as starting points and customize based on individual recovery, equipment access, and training history.
Maintenance, Safety, and Troubleshooting
Maintaining good mechanical condition of both the body and equipment is essential for long-term training success with the straight rope pulldown. On the human side, ensure adequate warm-up and mobility work for the shoulders and thoracic spine. On the equipment side, conduct regular inspections for frayed rope fibers, worn crimps, sticky pulleys, and loose carabiners. Create a checklist and perform quick pre-use checks—this habit prevents accidents and extends the service life of attachments and cables.
Injury prevention centers on movement quality: avoid using excessive momentum, shrugging the shoulders, or letting the lower back hyperextend. If pain—sharp or persistent—occurs, regress the movement to lighter loads, reduce range of motion, and consult a qualified professional if the discomfort does not resolve quickly. Rehabilitation protocols often include isometric and eccentric-focused progressions, scapular stabilization drills, and slow, pain-free range-of-motion work before reintroducing heavier loads.
Troubleshooting common issues: if you feel the exercise too much in the biceps, re-emphasize scapular depression and initiate the pull with the shoulder blades. If shoulders elevate, cue scapular down and use lighter loads. If the cable sticks or the rope twists excessively, inspect the swivel and replace worn hardware. Maintain a log of equipment issues and repair promptly to avoid abrupt failures during training.
Preventing injury and rehab considerations
To prevent injury, integrate scapular stabilization and rotator cuff activation exercises into warm-ups and weekly training. Examples include banded pull-aparts, external rotations at 90/90, and prone T/Y raises. Those recovering from shoulder issues should focus on pain-free ranges and gradual loading: start with light resistance band pulldowns at submaximal intensities, progress to unilateral work to isolate deficits, and gradually reintroduce bilateral heavier sets once full range and control are restored. Always prioritize quality over quantity; avoid the temptation to push through pain or use compensatory body motions that can exacerbate shoulder or lower-back problems.
Rehab professionals often apply eccentric-focused protocols and isometric holds at end ranges to rebuild tendon resilience and strength. For tendinopathies or impingement-like symptoms, reduce sheer forces by adjusting pulley height and modifying grip angles. Close communication between coach, physiotherapist, and trainee ensures a safe, phased return to heavier loads.
Equipment maintenance and inspection checklist
- Visual inspection: check rope for fraying, loose crimps, or exposed metal. Replace at first signs of wear.
- Pulley function: rotate pulley by hand (with weight removed) to feel for smooth motion; lubricate if sticky and replace bearings if noisy or resistant.
- Attachment hardware: ensure carabiners and swivels are rated for dynamic loads and locking mechanisms function properly.
- Seat and pads: check for torn upholstery and ensure adjustment pins secure without play during movement.
- Weight stack and selector pin: confirm the stack moves smoothly and the pin secures fully; never use makeshift pins or damaged selectors.
Regular maintenance intervals—monthly for light-use settings, weekly for commercial gyms—help identify potential hazards early. Keep a written log of inspections and replacements to manage equipment lifecycle and safety compliance.
FAQs
The following professional-style FAQs address common, practical questions about the straight rope pulldown. Each answer offers actionable guidance rooted in technique, programming, and safety considerations. These are designed to be referenced in training plans, gym orientations, and coaching conversations.
- Q1: How does the straight rope pulldown differ from a straight bar pulldown?
A1: The rope allows independent hand movement and a greater finish separation, promoting scapular depression and increased lat stretch. A straight bar fixes wrist position and often allows heavier loads but can encourage trap and biceps dominance if form degrades.
- Q2: Should beginners use the straight rope pulldown?
A2: Yes, beginners benefit from its controlled tension. Emphasize light loads, scapular control, and slow eccentrics to develop motor patterns before increasing weight.
- Q3: Where should I feel the exercise?
A3: Primarily in the lower and outer lat fibers, with secondary activation in the mid-back and posterior deltoids. If you feel it mainly in the biceps or traps, revisit form cues.
- Q4: Can I use the straight rope pulldown for triceps?
A4: Not as a primary triceps mover. A rope attachment is used for triceps pushdowns with different line-of-pull and elbow mechanics; the pulldown focuses on pulling motions and lats.
- Q5: How often should I train the straight rope pulldown each week?
A5: For hypertrophy, 2–3 times per week with 6–12 total sets. For strength emphasis, 2 sessions with 8–16 total sets spread across the week works well. Adjust based on recovery.
- Q6: What are common technical faults?
A6: Shrugging shoulders, using momentum, pulling with the arms first (rather than scapular set), and failing to control the eccentric. Correct with lighter loads and focused cueing.
- Q7: How do I progress the exercise?
A7: Increase load, manipulate tempo (slow eccentrics), add isometric pauses, or use unilateral variations to challenge stability and correct imbalances.
- Q8: Is the straight rope pulldown suitable for shoulder rehabilitation?
A8: It can be part of rehab when prescribed by a clinician, focusing on pain-free ranges, low load, and scapular stabilization. Avoid if it reproduces sharp pain.
- Q9: How should I breathe during the movement?
A9: Inhale at the top to brace the core; exhale during the concentric pull and maintain a steady inhale during the eccentric return. Avoid breath-holding during submaximal sets.
- Q10: Can I perform the pulldown standing?
A10: Yes, standing variations shift emphasis and can integrate core anti-flexion demands. Ensure stable foot positioning and adjust pulley height appropriately.
- Q11: What grip width is best?
A11: Neutral grip with hands about shoulder-width apart is a solid default. Wider separation emphasizes outer lats; narrower grips increase biceps involvement. Choose based on comfort and goals.
- Q12: How long should eccentric phase be?
A12: For hypertrophy, 2–4 seconds eccentric; for strength, moderate 1–2 second control is sufficient. Avoid uncontrolled rapid eccentrics which increase injury risk.
- Q13: What maintenance should gym staff perform for rope attachments?
A13: Weekly visual checks for fraying, monthly pulley and swivel inspections, and immediate replacement of damaged ropes. Keep an equipment log and retire ropes at the first sign of structural compromise.
These FAQs provide quick, professional guidance for integrating the straight rope pulldown into safe and effective training. Follow technique cues, maintain equipment, and tailor programming to individual goals and recovery capacity to maximize benefits.