
Straight Rubber Fixed Barbell: Selection, Use, Maintenance & Programming Guide
Overview: What Is a Straight Rubber Fixed Barbell and Why It Matters
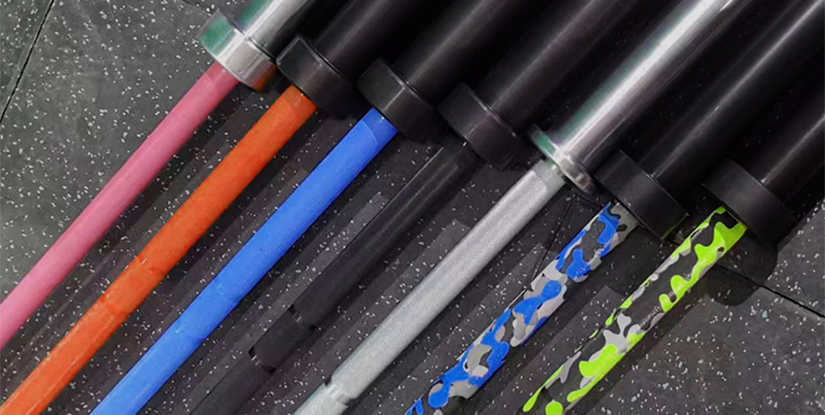
A straight rubber fixed barbell is a non-adjustable, straight-shaft barbell with integrated rubber-encased weight heads or permanently affixed rubber collars. Unlike Olympic bars that accept removable plates, fixed barbells come in discrete weight increments (e.g., 2.5kg, 5kg, 10kg, 15kg, up to 50kg). They are engineered for high-frequency use in commercial gyms, rehabilitation clinics, schools, and group fitness studios. The rubber encapsulation protects floors, reduces noise, and limits damage during accidental drops—advantages that matter when throughput, equipment lifespan, and member experience are priorities.
Market context: industry reports indicate steady growth in commercial gym equipment demand with a CAGR typically estimated between 4–6% in recent years driven by boutique studios and home fitness adoption. Fixed rubber barbells are increasingly specified because they reduce equipment theft, simplify changeovers in group classes, and require less maintenance than plate-loaded bars.
Key specifications to know (practical data):
- Typical shaft diameters: 25–29 mm depending on model and grip target (women’s or men’s profile).
- Common weights: 2.5, 5, 7.5, 10, 12.5, 15, 20, 25, 30, 35, 40, 45, 50 kg (fixed increments).
- Overall lengths: compact fixed barbells range from 0.8 m (dumbbell-like) to 2.2 m for longer straight fixed bars.
- Construction: steel shaft (often chrome or black oxide finish) plus vulcanized rubber heads or thermoplastic rubber coating.
Real-world applications and benefits:
- Group classes: faster transitions—trainers swap barbells of known weight instead of loading plates.
- Education and youth programs: fixed weights reduce technical risks from unsecured plates.
- Rehabilitation: predictable weight increments and reduced bounce when dropped.
- Commercial clubs: improved asset security and easier inventory management.
Visual element description: imagine a side-view diagram showing: shaft center-to-collar length, rubber head diameter vs. shaft diameter, and labeled knurl zones. Also visualize a top-down rack layout showing fixed barbells organized by color-coded heads for fast selection during classes.
Choosing the Right Straight Rubber Fixed Barbell: Step-by-Step Selection Guide and Case Study
Selecting the correct fixed barbell mix requires matching user profiles, programming needs, and facility constraints. Follow this step-by-step guide to build a rational inventory and avoid common procurement mistakes.
- Define user demographics: estimate average and 95th percentile lifters. For a mixed-gender general population gym, stock a range from 5kg to 50kg. For a women-focused studio, emphasize 2.5–30kg ranges and smaller shaft diameters (25–26 mm).
- Map programming needs: circuit classes may need many 10–20kg bars; strength areas require heavier 30–50kg options. Create a simple matrix: sessions per day vs. weight demand per session to calculate quantities.
- Assess floor and storage: fixed barbells with rubber heads reduce floor damage. If floor space is limited, choose stackable or wall-rack compatible profiles. Confirm rack slot dimensions: heads often 120–180 mm diameter—measure first.
- Material and finish: choose a shaft finish for grip and corrosion resistance—powder coat or chrome. For high-sweat environments, black oxide with regular maintenance is a robust choice.
- Vendor criteria: request tensile and fatigue test data, warranty terms (typical commercial warranties are 1–3 years), and sample units for feel testing.
Practical checklist (quick-buy):
- Essential starter set for a 30-person studio: 6× 5kg, 8× 10kg, 8× 15kg, 6× 20kg, 4× 25kg, 2× 30kg.
- Color-code or label each weight for rapid selection during classes.
- Allocate a dedicated bar rack with spacing to prevent rubber head deformation.
Case study: The Midtown Fitness Box
Scenario: a 200-member boutique gym switched 40% of its plate-loaded bars to straight rubber fixed barbells to speed up 45-minute circuit classes. Results after 6 months:
- Average class setup time dropped from 5.2 minutes to 2.1 minutes, increasing net training time by ~6 minutes per class.
- Equipment incidents (dropped plate mishandling) decreased by 48% because members used fixed bars instead of loading plates incorrectly.
- Maintenance calls for bent sleeves fell to near zero, saving ~$1,200 annually in repair costs.
Takeaway: matching inventory to programming delivered measurable throughput and cost benefits. When specifying, confirm real usage patterns for evidence-based purchasing.
Design Considerations and Technical Specs (Grip, Knurl, and Rubber Compound)
Understanding the technical design of the straight rubber fixed barbell is necessary for correct selection and long-term durability. The shaft material is usually medium-carbon steel with tensile strengths typically ranging 150–200 ksi in commercial-grade bars—this affects whip and fatigue life.
Knurl pattern: choose between aggressive, moderate, and no-knurl options depending on clientele. Aggressive knurling helps experienced lifters maintain grip during heavy lifts but may be uncomfortable for classes. For mixed-use studios, moderate knurling balances grip and comfort.
Rubber compound: high-quality vulcanized rubber offers superior impact resistance and less deformation over time compared to cheaper thermoplastic coatings. Look for durometer ratings: 70–90 Shore A is common for durable rubber heads; higher values mean firmer rubber and less deformation on drop. Heat and UV resistance matter for outdoor or high-ambient-temperature facilities.
Design checklist:
- Shaft diameter selection: 25–26 mm for smaller hands, 28–29 mm for standard lifters.
- Head geometry: larger diameter increases stability on the floor and reduces roll—ideal for functional training areas.
- Finish: chrome for corrosion resistance; powder coat for a matte, durable surface.
Visual element suggestion: close-up macro shot showing knurl depth and the rubber-to-steel bond for quality assurance documentation.
Installation, Programming, and Safe Use: Best Practices and Step-by-Step Protocols
Installing and programming fixed barbells is straightforward but benefits from a standardized protocol to maximize safety and longevity. Follow this practical sequence every time you introduce new fixed barbells to your facility.
- Unboxing and inspection: verify weight marking, shaft straightness within ±0.5 mm, and absence of rubber delamination. Document serials and take photos.
- Rack layout: assign bar weight zones; heavier bars at lower rack levels. Leave 100–150 mm clearance between heads to avoid rubber abrasion.
- Staff briefing: run a 30-minute hands-on session to teach correct lifting mechanics with fixed bars and safe drop protocols. Emphasize neutral wrist alignment and bar path for squats and presses.
- Programming templates: include fixed bar progressions. Example week: Day 1 (Strength): 3 sets × 5 reps with 80% 1RM using fixed bar weights; Day 3 (Hypertrophy): 4×10 using lighter fixed barbells for metabolic circuits.
- Maintenance schedule: weekly wipe-down with mild detergent, monthly shaft inspection for corrosion, annual rubber integrity test (visual plus compression test).
Practical safety rules:
- Never exceed designed load—even though fixed barbells have integrated heads, they are tested for intended weight only.
- For overhead work, ensure ceiling clearance based on head diameter and movement path.
- Provide training signage with pictograms illustrating safe lifting and drop zones.
Maintenance, Lifecycle Costs, and Procurement Best Practices
Planned maintenance and procurement strategy determines total cost of ownership (TCO). Fixed barbells often deliver lower TCO than plate-loaded alternatives because of reduced replacement parts and simplified inventory management. Below is a maintenance plan and cost model approach to estimate lifecycle expenditure.
Maintenance schedule (monthly/quarterly/annual):
- Weekly: visual surface clean, wipe sweat, check for rubber tears.
- Monthly: inspect shaft straightness using a straightedge; check head bonding for separation.
- Quarterly: record weight inventory, verify labels, lubricate any exposed metal joints (if applicable).
- Annual: compressive integrity test on rubber (compare initial height vs. current), full photographic record for warranty claims.
Simple TCO model (example):
- Initial purchase: $120–$350 per fixed bar (varies by weight and finish).
- Expected life: 5–10 years in a commercial setting with regular maintenance.
- Annual maintenance cost: estimated $5–$20 per unit for cleaning and inspections; repair or replacement costs vary—budget ~5–10% of initial value annually for heavy-use facilities.
Procurement tips and warranty negotiation:
- Request product test reports: ask for impact resistance and bonding test certificates.
- Negotiate sample trials: test 2–3 bars in real classes before mass purchase.
- Bundle deals: manufacturers often provide discounted racks and accessories when you buy in volume—leverage that to standardize equipment across sites.
Case example: Multi-site club chain standardized on one fixed bar model across 12 locations. By consolidating vendors they reduced per-unit cost by 18% and simplified spare parts logistics, yielding a projected payback within 14 months.
Cleaning, Storage, and Rubber Preservation Techniques
To extend rubber life and maintain appearance, use the following cleaning and preservation regimen. Avoid petroleum-based cleaners that can degrade rubber and use pH-neutral detergents.
- Daily: quick wipe with diluted mild detergent (1:50 ratio) and a microfiber cloth.
- Weekly: deeper clean with a soft brush for textured heads; avoid harsh solvents.
- Seasonal: apply rubber conditioners (manufacturer-approved) if bars are exposed to extreme temperatures; maintain indoor relative humidity between 30–60% to reduce oxidation.
Storage tips: store bars horizontally on padded racks; avoid stacking rubber heads directly on top of each other for long periods to prevent deformation. Keep bars away from direct sunlight and heat sources to prevent rubber hardening or cracking.
Inventory Management and Data-driven Replacement Planning
Use a simple digital inventory spreadsheet or asset-management system to track purchase date, location, repair history, and inspections. Key metrics to monitor:
- Mean time between failures (MTBF) per unit
- Repair frequency per 1000 uses
- Replacement rate by age cohort (e.g., percent replaced after 3, 5, 7 years)
By tracking these, you can forecast replacement budgets and align procurement cycles across facilities. Use QR-coded labels on each bar to scan and pull its maintenance history in seconds—this reduces downtime and supports warranty claims.
FAQs (专业 style)
Q1: What distinguishes a straight rubber fixed barbell from a standard Olympic bar?
A1: A straight rubber fixed barbell has permanently attached, rubber-encased weight heads and fixed total mass; an Olympic bar accepts removable plates and variable loading. Fixed bars simplify selection and reduce setup time, while Olympic bars offer infinite incremental loading and typically greater tensile specifications.
Q2: Are fixed rubber barbells safe for heavy lifts like deadlifts and squats?
A2: Yes—when selected with appropriate shaft diameter and construction for the user population. Choose bars with solid steel shafts and tested rubber heads; maintain regular inspections for shaft straightness and rubber integrity.
Q3: How do I determine the right shaft diameter?
A3: Match shaft diameter to user hand size and intended exercises. 25–26 mm suits smaller hands and endurance classes; 28–29 mm suits standard strength training. Test sample bars with staff and advanced members before large-scale procurement.
Q4: What maintenance can prolong bar life?
A4: Regular cleaning with mild detergents, monthly inspections for bonding separation, and avoiding harsh solvents or extreme heat. Implement scheduled checks and document findings to catch wear early.
Q5: How should fixed barbells be stored to avoid damage?
A5: Store horizontally on racks with adequate padding, avoid stacking rubber heads directly, maintain indoor climate control, and color-code weights for easy handling.
Q6: Do rubber heads affect lifting dynamics?
A6: Rubber heads slightly alter balance and inertial properties compared to plate-loaded bars—users may notice different swing or roll characteristics. Program acclimation sets for members transitioning from plate-loaded bars.
Q7: What warranty elements are important?
A7: Require manufacturing defect coverage, bonding failure protection, and clear terms around wear vs. defect. Ask for documented test results and at least a one-year commercial warranty with options to extend.
Q8: How many fixed barbells should a class-based studio buy?
A8: Base quantities on class size and cyclic demand. A 20–30 participant studio commonly stocks 20–30 bars across multiple weight tiers to ensure rapid transitions and accommodate differing strength levels.
Q9: Can I mix fixed barbells and adjustable bars in the same facility?
A9: Absolutely—many facilities mix both to serve varied programming. Use fixed barbells for high-throughput classes and adjustable/plate-loaded bars in dedicated strength areas where progressive overload and microloading are prioritized.