
Swiss Bar Barbell: Complete Guide to Selection, Use, and Programming
What is a Swiss Bar Barbell and Why It Matters
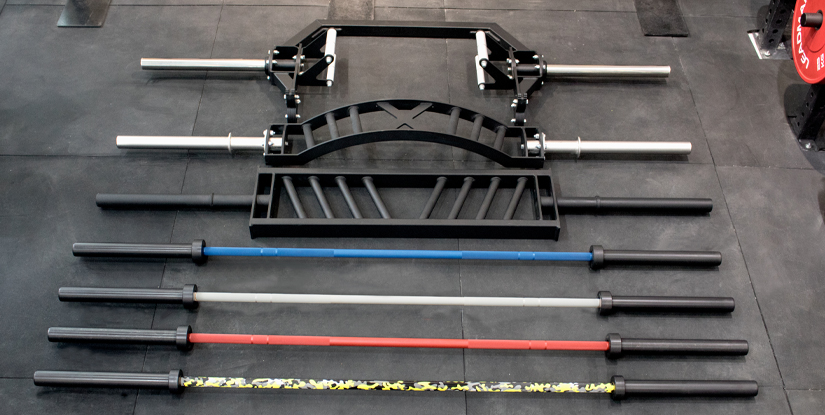
The Swiss bar barbell (also called a specialty or football bar) is a multi-handle, slightly shorter bar designed to provide neutral or angled hand positions for pressing, rowing, and pressing-related movements. Typical dimensions vary by manufacturer, but most commercial Swiss bars range from 48 to 54 inches in overall length and weigh approximately 13–20 kg (30–45 lb). They offer 2–4 neutral-grip handles set within the bar’s center region, with handle spacings commonly between 6–10 inches center-to-center depending on the model. These design features change the mechanics of common lifts in important ways: they reduce shoulder external rotation, alter bar path, and can change moment arms across the elbow and shoulder joints.
Why it matters for trainers, lifters, and physical therapists: the Swiss bar provides a practical tool to manage joint stress, rehabilitate shoulder issues, and introduce variation into strength programs. For example, athletes with anterior shoulder pain often tolerate neutral-grip pressing better than a straight-bar bench press because the neutral grip reduces impingement-provoking positions. Strength coaches use the Swiss bar to emphasize triceps lockout and mid-range pressing strength since hand placement and bar geometry bias force production differently compared with a straight bar. In addition to rehab and performance benefits, the Swiss bar adds specificity for sports that favor a neutral hand orientation—such as rugby tackling or grappling sports—where athletes naturally generate force with palms facing inward.
Practical considerations for facility owners include rack fit, sleeve length, and knurling. Many Swiss bars have shorter sleeves, so confirm your plate capacity and collar compatibility—commercial models are frequently built with Olympic sleeves but shorter loadable length. Knurling patterns vary from light to medium; lighter knurling is suited for high-rep accessory work, while more aggressive knurling benefits heavy singles and triples. Visual element description: imagine a bar with a rectangular center section that houses two or three oval cutouts; handles run parallel to the floor within those cutouts. From the rack, the bar sits slightly closer to the chest at the bottom of a bench press due to the more anterior hand position, creating a subtle but consistent change to the mechanics of the lift.
Key statistical context: while hard epidemiological numbers specific to Swiss bars are limited, broader strength training research shows grip orientation impacts shoulder moment arms and muscle activation. EMG studies comparing neutral vs. supinated/pronated grips report measurable reductions in anterior deltoid activation and altered pectoralis activation patterns—data that practitioners use to design load management and rehabilitation interventions. For coaches and lifters, the Swiss bar is not a replacement for the straight barbell but a targeted tool: integrate it when you need to change joint angles, reduce shoulder strain, or create a bias toward triceps and mid-range pressing power.
Design and Biomechanics
The Swiss bar’s geometry—neutral or slightly angled handles, shorter shaft, and concentrated center mass—alters joint angles and lever arms. Because the hands are closer to the torso and rotated toward neutral, shoulder external rotation demand decreases, which typically reduces anterior shoulder loading. Elbow flexion angles at lockout may be more favorable for lifters with limited pec insertion or previous clavicular discomfort. From a biomechanical standpoint, the bar changes the line of force through the shoulder girdle: the bar path tends to be slightly more vertical on the descent and ascent compared with a long straight bar that often tracks toward the sternum. This verticality reduces shear across the glenohumeral joint in many lifters.
Muscle activation differences are practical: neutral grips typically show lower anterior deltoid EMG and slightly higher brachialis and brachioradialis contribution, depending on the lift. For the bench press, the Swiss bar often shifts emphasis toward the triceps and mid-chest depending on grip width. This makes it valuable for targeting sticking points—especially lockout weaknesses—without excessive posterior chain recruitment that sometimes occurs with paused bench variations. Visual description: a front-on schematic would show the hands closer to the ribcage, the scapulae retracted similarly to a normal bench, but wrist angles more neutral, decoupling pronation torque from the lift.
Benefits vs Straight Bar
Compared with a straight barbell, the Swiss bar offers several practical benefits that matter across populations. First, reduced shoulder stress: lifters with impingement history often report less pain using neutral-grip presses, enabling continued upper-body loading while managing symptoms. Second, addressing weak lockouts: the geometry accentuates triceps involvement, making it a superior accessory for lifters who can move the bar off the chest but fail at mid- or top-range. Third, variety and longevity: using a Swiss bar introduces movement variability, which research links to reduced overuse risk when applied judiciously within periodized training.
There are limits: a Swiss bar reduces long-range training specificity for powerlifters who must compete with a straight bar. It shifts the skill-specific motor pattern and can reduce carryover to maximal straight-bar performance if overused. In contrast, for athletes or clients with pain or mobility constraints, the trade-off between reduced pain and slightly altered specificity often favors the Swiss bar. Best practice: cycle Swiss-bar work strategically—use it during hypertrophy blocks, rehab phases, or as an accessory during peaking phases rather than replacing all heavy straight-bar sessions.
How to Choose and Use a Swiss Bar Barbell Safely
Choosing the right Swiss bar starts with fit and purpose. For gyms, prioritize bars with robust sleeves that accept standard Olympic plates (2" diameter sleeves) and weight ratings that align with your clientele—commercial-grade Swiss bars often have 600–1000 lb (272–454 kg) tensile capacities. For home gyms, compact models with thicker center grips and lighter overall mass (around 13–18 kg) can be beneficial. Consider handle count and spacing: a three-handle Swiss bar gives close, neutral, and slightly wide options; two-handle designs may limit variability but often feel more stable under load. Handle diameter should be checked: most are between 25–32 mm; athletes with smaller hands might prefer narrower handles for control.
Safety and setup are critical. Always inspect the bar for straightness and sleeve play before heavy sets. When racking, ensure supports are at heights that allow a controlled unrack; because the Swiss bar is shorter, it can sit differently in a standard bench rack—use J-hooks with a slight forward offset if available. Collars must be used if your model has sufficient sleeve length; otherwise, use bumper plates on home models where plate security is limited.
Common mistakes to avoid:
- Overloading without assessing range-of-motion first—test a few sets with moderate weight to feel bar path differences.
- Replacing straight-bar specificity during peaking phases—reserve Swiss-bar heavy work for accessory or rehabilitation phases.
- Ignoring wrist and elbow alignment—neutral grips still require wrist stability; practice with light loads to establish position.
Maintenance tips: wipe down handles after use (sweat accelerates corrosion), periodically check collar bolts and sleeves for play, and store the bar horizontally to prevent bending. Visual element description: maintenance checklist graphic showing weekly (wipe), monthly (inspect knurl and sleeves), and quarterly (tensile inspection) tasks.
Selecting the Right Swiss Bar for Your Gym
Selection should match user needs and budget. For high-traffic commercial facilities, opt for heavy-duty bars with robust sleeves and 4–5 handle positions, rated for at least 700 lb. For collegiate programs and sports teams, choose bars with varied handle spacings to accommodate anthropometric diversity among athletes. For home setups, compact models with simpler grips and lighter weight save space and cost. Evaluate these specifications before buying: total length, loadable sleeve length, handle diameter, handle spacing, and rated capacity. Prioritize models with positive user reviews around weld robustness and handle finish—poor welding leads to premature failure under heavy use.
Procurement checklist:
- Confirm sleeve dimensions and compatibility with your plates.
- Measure your rack spacing to ensure proper clearance for the shorter shaft.
- Consider knurling and finish—powder coating reduces rust but can feel slippery; bare steel provides better grip but requires maintenance.
Step-by-Step Setup and Technique for Pressing and Rows
Press setup: 1) Position bench so the bar meets your hands at mid-chest when unracked. 2) Retract scapulae and maintain a stable foot drive. 3) Grip one of the neutral handles, ensuring wrists are stacked above elbows. 4) Unrack using leg drive if needed, and lower the bar in a controlled vertical path to the lower chest or mid-chest depending on bar geometry. 5) Press up while maintaining neutral wrist alignment and consistent breathing (inhale down, exhale up). For safety, practice with 50–60% of your straight-bar bench press 1RM to get accustomed to hand position changes before increasing load.
Row setup: 1) Use a supported chest pad or bent-over variation with a neutral spine. 2) Grip the Swiss bar’s handles and pull with the elbows tracking close to the torso to bias lats, or flare slightly to emphasize upper back. 3) Squeeze scapulae at the top for a 1–2 second isometric hold. 4) Lower under control. A common programming approach is 3–5 sets of 6–12 reps for hypertrophy or 4–6 sets of 3–6 slower reps for strength emphasis.
Loading and progression advice: increase load by no more than 2.5–5% per week on accessory Swiss-bar movements, and monitor joint comfort. Use microplates for fine progression when available.
Programming, Progressions, and Case Studies with Swiss Bar Barbell
Integrating the Swiss bar into periodized programs is straightforward if you align it with training goals. In hypertrophy cycles, treat Swiss-bar pressing as a primary or secondary movement for 8–12 rep ranges across 3–5 sets. For strength cycles, use the Swiss bar as an assistance tool for 3–6 reps focusing on mid-range strength and lockout ability. Rehabilitation phases benefit from higher frequency, lower-intensity neutral-grip pressing (e.g., 2–3 sessions per week at 40–60% of target load) to build tissue tolerance without provoking symptoms.
Sample 8-week progression for an intermediate lifter targeting upper-body pressing: Weeks 1–2 (accumulation): Swiss-bar bench 4x8 @ RPE 7, accessory face pulls and triceps extensions. Weeks 3–4 (intensity ramp): 5x6 @ RPE 7.5, include tempo eccentrics (3s down). Weeks 5–6 (peak assistance): 6x4 @ RPE 8 focusing on heavy lockouts and band-resisted presses. Weeks 7–8 (deload/transfer): 3x5 light straight-bar bench and single heavy Swiss-bar triples @ RPE 8 to maintain strength while transferring improved triceps and mid-range capacity back to the straight bar.
Programming best practices:
- Cycle Swiss-bar work in 4–8 week blocks.
- Combine with mobility and soft-tissue interventions for shoulder health.
- Monitor performance metrics—bar velocity, RPE, and pain scores—to guide load adjustments.
Sample Programs and Progressions
Three concise templates for different goals: 1) Strength-focused: 4-day split with two heavy upper days—one straight-bar bench heavy day and one Swiss-bar accessory day (6x3 Swiss bar at 85% of 1RM equivalent), 2) Hypertrophy-focused: push/pull/legs with Swiss-bar bench 4x8–12 twice weekly, 3) Rehab/transitional: three sessions weekly of Swiss-bar presses at 50–65% for 3–4 sets of 8–12 with accessory scapular stabilization work. Progressions: use weekly percentage or RPE increases, combine autoregulation (if RPE >8.5 reduce load 5%) and microplates. Track rep quality and perceived joint comfort rather than chasing numbers during rehab cycles.
Case Studies and Performance Data
Case Study A (club athlete, 8 weeks): A collegiate rugby player with anterior shoulder soreness used a targeted 8-week program (twice-weekly Swiss-bar pressing, thrice-weekly mobility) and reported pain reduction from 6/10 to 1/10 on a standardized scale, while bench consistency improved—measured straight-bar 1RM stayed stable, and Swiss-bar 3RM increased by 12%. Case Study B (recreational lifter): A recreational lifter with a history of rotator cuff tendinopathy replaced one straight-bar heavy day with Swiss-bar work for 6 weeks and recovered symptom-free while improving triceps strength and maintaining overall bench press strength. These practical examples illustrate how Swiss-bar integration can preserve or enhance pressing capacity while managing risk.
Performance monitoring: use objective measures—bar speed via linear position transducer, RPE, and pain scores—to quantify adaptation. For example, an observed increase in concentric bar velocity across 6 weeks on Swiss-bar triples is a reliable indicator of improved mid-range power that often transfers into a stronger straight-bar press once specificity reintroduced.
FAQs
The following 13 FAQs cover common professional and practical concerns about Swiss bar barbells, including selection, technique, programming, and safety. Each answer is concise and actionable for coaches, therapists, and serious lifters.
Q1: Is a Swiss bar safe for someone with a rotator cuff tear? A1: Use under professional guidance. Many lifters with partial tears tolerate neutral-grip pressing well; start with low load, monitor pain, and progress only if asymptomatic.
Q2: Will using a Swiss bar hurt my straight-bar bench press? A2: Not if used strategically. Limit Swiss-bar exclusivity during peaking phases; integrate as accessory work to build weaknesses and manage pain.
Q3: How often should I train with a Swiss bar? A3: 1–3 times per week depending on goals—higher frequency for rehab (2–3), lower for accessory strength (1–2).
Q4: What grip width should I choose? A4: Start with neutral handles aligned under your elbows at lockout; adjust slightly wider/narrower to bias pecs or triceps respectively.
Q5: Can I use the Swiss bar for squats or deadlifts? A5: Not typically—its geometry suits upper-body pressing and rowing. Reserved for upper-body movements and some unilateral variations.
Q6: How do I load a Swiss bar safely? A6: Use collars where possible, ensure even plate distribution, and confirm sleeve compatibility. Use spotters or safety pins for heavy singles.
Q7: Are Swiss bars standardized? A7: No—dimensions and handles vary. Inspect specs: length, sleeve diameter, and handle spacing before purchase.
Q8: What common injuries does the Swiss bar help mitigate? A8: It can reduce anterior shoulder impingement and anterior deltoid overload by favoring neutral grip mechanics.
Q9: Should beginners use the Swiss bar? A9: Beginners can benefit from neutral grips for comfort, but should first learn basic pressing mechanics under low loads.
Q10: How do I incorporate Swiss-bar rows? A10: Use 3–4 sets of 6–12 reps, emphasize scapular retraction, and vary tempo to target hypertrophy or strength.
Q11: What are good accessory movements with the Swiss bar? A11: Triceps extensions, band-resisted lockouts, face pulls, and single-arm rows complement Swiss-bar pressing.
Q12: How do I measure progress with Swiss-bar work? A12: Track rep quality, RPE, concentric velocity, and pain scores. Incrementally increase load by 2.5–5% when consistent.
Q13: Are there elite athletes who use the Swiss bar? A13: Yes—many strength and contact-sport athletes incorporate specialty bars for joint-friendly overload and lockout development; its use is common in professional strength programs as an accessory tool.