
Complete Guide to Choosing, Using, and Maintaining a Weight Set and Barbell
Choosing the Right Weight Set and Barbell: types, sizing, and real-world selection
Selecting the right weight set and barbell is the single most impactful equipment decision for strength training, whether you’re building a home gym or equipping a commercial facility. Core considerations include barbell type (Olympic, standard, power, or technique bars), plate material (cast iron, urethane, rubber-coated bumper plates), load capacity, and the specific training goals of the user. Industry estimates put the global home fitness equipment market above $10 billion in the early 2020s with steady growth; barbells and plates remain the top-selling category for durability and versatility.
Key specifications to evaluate:
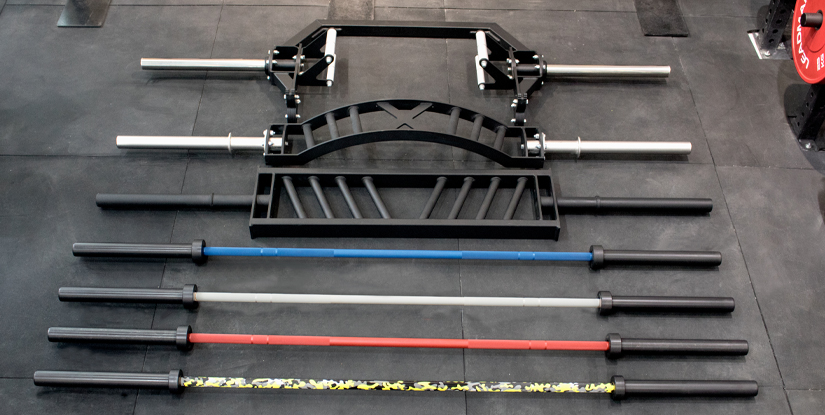
- Barbell weight and dimensions: A standard Olympic men’s barbell typically weighs 20 kg (44.1 lb) and measures ~7.2 ft (2.2 m); women’s Olympic barbells usually weigh 15 kg (33.1 lb) and are shorter. Power bars often have thicker diameters (29–32 mm) and higher tensile strength.
- Load capacity and tensile strength: Look for tensile strength ratings: 150,000 psi+ is common for commercial bars, with load capacities often listed between 700–1500+ lbs. Higher tensile strength indicates better resistance to bending under heavy loads.
- Knurling and sleeve diameter: Aggressive knurling improves grip for heavy lifts; sleeve rotation (bushing vs. bearing) affects Olympic lifts — bearings allow smoother plate spin during snatches and cleans.
- Plate types: Bumper plates (rubber) are essential for dropping the bar; iron plates are compact and cost-effective; urethane plates are durable and quiet in commercial settings.
Practical examples:
- A home user focused on general strength and hypertrophy: 20 kg Olympic barbell (700–900 lb capacity), pair of 45 lb (20.4 kg) bumpers, plus a set of iron plates increments (2.5–25 lb).
- An athlete training Olympic lifts: 15 or 20 kg barbell with high-quality bearings and medium knurl, full set of bumper plates (10–25 kg increments), and platform or reinforced flooring.
- A garage gym on budget: a standard 1-inch diameter barbell with threaded collars and cast-iron plates — cost-effective but limited for heavy Olympic lifts or repeated dropping.
Case study: A small CrossFit-affiliated box decided to replace aging barbells. They chose 20 kg competition-style bars (yield strength 205,000 psi; bearings) and 10–25 kg calibrated bumpers. Over 12 months, athlete satisfaction improved and maintenance calls dropped by 40% due to reduced bar wear and plate damage. This demonstrates how investing in appropriate bar/plate specs reduces long-term operational costs.
Buying checklist (quick reference):
- Define primary use: powerlifting, Olympic lifting, general fitness, or conditioning.
- Match bar diameter and knurl to grip strength and lifting style.
- Choose plate material based on drop tolerance and noise requirements.
- Verify load capacity and warranty; inspect finish and sleeve rotation mechanism.
Visual element description: include a comparison table (barbell type vs. recommended use vs. tensile strength vs. average cost) and a photo gallery showing plate materials and knurl patterns for quick visual selection when purchasing online or in-store.
How to match equipment to training goals and budgets
Matching a weight set and barbell to training goals requires aligning lift types, frequency, and budget constraints. Strength athletes prioritize bars with high tensile strength (180–220k psi) and stiffer shafts to minimize whip; Olympic lifters prefer bars with faster sleeve spin (bearings) and moderate whip. Hypertrophy-focused trainees can prioritize cost-effective plates and a reliable 20 kg bar with medium knurling.
Budget tiers and recommended specs:
- Entry-level ($100–$400): Standard barbells or lower-end Olympic bars, cast iron plates. Suitable for beginners not dropping bars. Typical tensile strength < 150k psi.
- Mid-tier ($400–$900): Quality Olympic bars, urethane or higher-grade rubber bumper plates, 150–190k psi tensile ratings. Good for most home and small gym setups.
- Professional/commercial ($900+): Competition bars, calibrated plates, 190k–215k+ psi tensile ratings, bearings, lifetime warranties. Ideal for heavy daily use.
Example program match:
- If 60% of sessions include heavy deadlifts or squats, prioritize a power bar with high load capacity and sturdy sleeve attachments.
- If Olympic lifts exceed 30% of sessions, invest in a bar with bearings and high-quality bumpers to protect flooring and plates.
- For mixed training, a durable mid-tier Olympic bar and a mixed set of bumpers and iron plates give versatility at reasonable cost.
Tip: measure available space and ceiling height before purchasing long bars or planning overhead lifts. Track the unit cost per usable year: a $600 bar used daily for five years may represent better value than a $200 bar needing replacement every 12–18 months.
Setting Up and Using a Weight Set and Barbell Safely: step-by-step setup, technique, and injury prevention
Proper setup and technique are essential to get the most from your weight set and barbell while minimizing injury risk. A systematic setup should cover equipment placement, platform or flooring, rack adjustment for individual anthropometrics, and the safety hardware required (safeties, collars, and spotters). According to injury surveillance data in strength sports, most barbell-related injuries stem from inadequate technique, improper loading, or lack of safety catch systems during heavy lifts.
Step-by-step setup guide:
- Inspect equipment: Check bar sleeves for smooth rotation, ensure collars clamp securely, and verify plate integrity (no hairline cracks in bumper plates).
- Flooring and platform: Use 3/4" plywood platform with rubber tiles or commercial platform. Bumper plates need shock-absorbing surface to reduce noise and stress on plates.
- Rack height and safety pins: Adjust J-cups and safety pins to match lifter’s range of motion. For squats, set safety pins just below the lowest safe depth; for bench press, ensure safeties are at a level to catch the bar without obstructing the lift.
- Load distribution: Load plates symmetrically and secure with collars; follow weight math and verify totals before attempting heavy lifts.
Technique and warm-up protocol:
- Begin sessions with a 10-minute general warm-up (bike, row), then perform dynamic mobility relevant to the lift (hip hinges, shoulder dislocates).
- Perform progressive warm-up sets: 40% x5, 60% x3, 75% x2 before heavy singles or triples. This primes the nervous system and reduces risk of sudden overload.
- Use spotters or safety catches when attempting reps near maximal loads; consider a coach for technical lifts like snatch and clean & jerk.
Common mistakes and prevention:
- Rounding the back on deadlifts — fix with lighter loads and hip hinge drills.
- Dropping collars or loose plates — always use secure collars and inspect before lift.
- Overloading thin shafts beyond rated capacity — respect tensile and load limits listed by manufacturers.
Case study: A 28-year-old amateur powerlifter transitioned from a budget bar to a certified power bar with 200k psi rating and realized a 10% improvement on heavy singles due to reduced whip and improved confidence on 90%+ lifts. The athlete also incorporated safety pins and a fixed warm-up progression, which eliminated a recurring lower-back strain.
Visual element description: include step-by-step photos for rack setup and progressive warm-up percentages chart paired with a downloadable 8-week safety-focused technique checklist to guide new coaches and home lifters.
Progressive loading: programs and practical progression protocols
Progressive overload with a weight set and barbell can be structured with weekly intensity or volume adjustments. Common templates include linear progression for novices, undulating periodization for intermediates, and block periodization for advanced lifters. Example progressive plan for intermediate lifter (12-week block):
- Weeks 1–4 (Accumulation): 4 sessions/week, emphasis on volume. Main lifts 4 sets of 6–8 at 70–80% 1RM. Accessory work targets weak links (RDLs, paused squats).
- Weeks 5–8 (Intensification): 3–4 sessions/week, 3–5 sets of 3–5 at 80–90% 1RM with heavier singles on day 4.
- Weeks 9–12 (Peaking/Deload): Week 9–10 peak sets at 90–95% for singles or doubles; week 11 reduce volume by 30%; week 12 deload with technical work.
Practical tips:
- Track loads and RPE — use small incremental jumps (2.5–5 lb plates) once technique is stable.
- Use microloading for advanced trainees when major jumps stall; add 0.5–2.5 lb increments.
- Periodically test 1RM or use rep-to-rep calculators to estimate progress without frequent max attempts.
Maintenance, Storage, and Buying Best Practices for Longevity
Proper maintenance and intelligent buying choices increase the life span of a weight set and barbell, lower lifetime cost, and protect user safety. Maintenance falls into routine cleaning, mechanical checks, and storage solutions. A proactive maintenance schedule helps retain resale value and prevents premature failures that could lead to injuries.
Routine maintenance checklist (monthly/quarterly):
- Monthly: Wipe down barbells with a dry brush and lightly oil the shaft to prevent rust in humid environments. Inspect knurling and sleeves for burrs or deformation.
- Quarterly: Remove sleeves (if designed for it) and inspect bearings or bushings. Re-grease bearings per manufacturer guidelines and check end-cap security.
- Annually: Full inspection of plate integrity (look for cracks in cast plates or delamination in bumper plates). Replace worn collars and reorder safety components as needed.
Storage tips:
- Use vertical plate trees or horizontal racks to avoid plates stacking on concrete that may cause chipping. Keep bumper plates upright on plate racks where possible.
- Store barbells horizontally on wall racks or vertical stands to prevent bending from leaning against walls. Do not rest heavy loaded bars on soft surfaces for extended periods.
- Control humidity in the training area; use a dehumidifier or climate control to reduce rust risk.
Buying best practices and warranty considerations:
- Buy from reputable manufacturers that publish tensile strength, sleeve rotation specs, and warranty terms. Warranties often cover bending or shaft breakage but may exclude normal wear (knurling erosion).
- Compare cost-per-use: calculate expected life years (e.g., 5–10 years) and divide price by estimated annual sessions to quantify value.
- When purchasing used equipment, inspect for straightness (roll bar on flat surface), shaft pitting, and plate cracks; negotiate price accordingly.
Cost examples (approximate and market-dependent):
- Basic weight set (standard bar + cast plates): $100–$300.
- Mid-range Olympic bar + mixed plates: $400–$900.
- Commercial competition bar + calibrated plates set: $1,200–$3,000+.
Case study: A boutique gym replaced cheap bumper plates that repeatedly split after 2 years. They invested in urethane-coated bumpers with a 5-year warranty; upfront cost increased 45%, but replacement cycles dropped from 2 years to 6+ years, reducing long-term equipment expense and downtime.
Care and troubleshooting for common problems
Common problems with barbells and plates include squeaky or stuck sleeves, rusty shafts, and delaminated bumper plates. Troubleshooting steps:
- Stuck sleeves: Clean with isopropyl alcohol; apply PTFE-based lubricant or light machine oil to bearings or bushings. If bearings are damaged, replace them or consult a professional technician.
- Rust on shaft: Use a brass brush to remove surface rust, then apply 3-in-1 oil or barbell-specific maintenance oil. For heavy pitting, consider professional re-coating or replacement.
- Delaminated bumpers: Inspect regularly; if separation occurs, retire plates to non-impact roles (storage stacks) and replace for overhead drops.
Visual element description: include an illustrated troubleshooting flowchart covering diagnosis (noise, wobble, surface damage) and recommended fixes with estimated labor/time and cost ranges for DIY vs. professional repair.
Frequently Asked Questions
Q1: What is the difference between an Olympic barbell and a standard barbell?
A: Olympic barbells have 2-inch (50 mm) sleeves to accept Olympic plates and usually weigh 20 kg (men’s) or 15 kg (women’s). They also feature rotating sleeves (bearings/bushings) for dynamic lifts. Standard barbells typically have 1-inch sleeves and are used with smaller, lower-cost plates.
Q2: How much should a beginner spend on a weight set and barbell?
A: Beginners can start with a mid-range setup (~$200–$600) including a reliable 20 kg bar and a set of plates allowing incremental progression. Prioritize a sturdy bar and secure collars over premium plates initially.
Q3: How do I calculate the total load on my bar?
A: Sum the weight of all plates on both sleeves and add the bar weight (e.g., bar 20 kg + two 20 kg plates = 60 kg total). Always verify using plate markings and a scale when precise loading is required.
Q4: Can I use bumper plates for all barbell training?
A: Yes, bumper plates are versatile and safe for dropped lifts, but they are bulkier and more expensive. Many gyms pair bumpers for Olympic work and iron plates for incremental loading in strength training.
Q5: How often should I clean or oil my barbell?
A: Wipe bars after each session. Apply light oil monthly in humid climates or every 3–6 months in dry conditions. Deep maintenance (bearing greasing) is recommended quarterly for high-use commercial bars.
Q6: What size plates should I buy first?
A: Start with a set that includes small increments: 2.5 kg (5 lb), 5 kg (10 lb), 10 kg (25 lb), and larger 15–20 kg (35–45 lb) plates to enable steady progression from light to heavy loads.
Q7: Is a center knurl necessary?
A: Center knurling helps with back squats by preventing the bar from slipping on the back. Powerlifters often prefer center knurl; Olympic lifters may prefer minimal or no center knurl to reduce chafing during dynamic lifts.
Q8: Are used barbells worth buying?
A: Used barbells can be a good value if they pass inspection: straightness check, minimal shaft pitting, secure sleeves, and acceptable knurl. Factor in potential cost of reconditioning.
Q9: How do I store a full loaded bar safely?
A: Avoid leaving loaded bars on soft surfaces. Use rack J-cups or a dedicated bar stand, and if storing horizontally, support the bar at multiple points to prevent bowing over time.