
Comprehensive Guide to the Functional Trainer Power Rack: Selection, Setup, Programming, and Maintenance
Overview: What Is a Functional Trainer Power Rack and Why It Matters
A functional trainer power rack combines two popular pieces of fitness equipment — the power rack (or squat cage) and the functional trainer (cable pulley system) — into one integrated station. This hybrid gives users the structural capacity for heavy barbell lifts (squat, bench, pull-up variations) alongside the versatility of cable resistance for unilateral, rotational, and functional movement patterns. For personal trainers, commercial gyms, and serious home-gym owners, the functional trainer power rack reduces the footprint required for a broad exercise library while increasing training efficiency and safety.
Market data and adoption trends show a steady rise in hybrid units: industry reports indicate multi-function stations account for approximately 18–25% of strength-equipment sales growth in premium and boutique gym sectors over the last five years. Workout efficiency is a primary driver: studies of time-on-task in gyms show integrated stations reduce transition time between sets by an average of 32%, which is valuable in high-throughput commercial settings.
Key specifications to evaluate when assessing a functional trainer power rack include: load capacity (often 1000–1500+ lbs for commercial-grade racks), cable weight stack or plate compatibility (select configurations offer 160–300 lb stacks or plate-loading pulleys), footprint (typical widths 48–72 in, depths 40–60 in), and ceiling height requirements for integrated pull-up bars or lat towers. Safety features such as adjustable safety pins, spotter arms, and plate-locking mechanisms are essential when the rack will be used for heavy barbell work. Accessible accessory compatibility (landmine, dip handles, band pegs, j-cups) expands functionality and direct ROI for gyms.
Real-world applications range from athletic performance training, rehabilitation clinics using controlled eccentric/concentric cable motions, to home gyms prioritizing space efficiency. For example, a collegiate strength coach might use the power rack for heavy squats and the cable system immediately after for unilateral cable split squats and anti-rotation Pallof presses to address core stability — all within the same station, reducing equipment sharing and session time.
When deciding whether to invest in a functional trainer power rack, weigh user demographics (strength athletes vs. general fitness clients), space constraints, and budget. Commercial-grade units commonly start at $2,500–$5,000, while robust home-gym models fall in the $1,200–$3,000 range. Durability matters: expect a longer lifecycle and lower maintenance cost per user with steel construction rated for >700 kg load cycles and high-quality pulleys and cables. Keep in mind warranties (frame vs. wear items) and serviceability — modular designs with replaceable cables and pulleys reduce downtime.
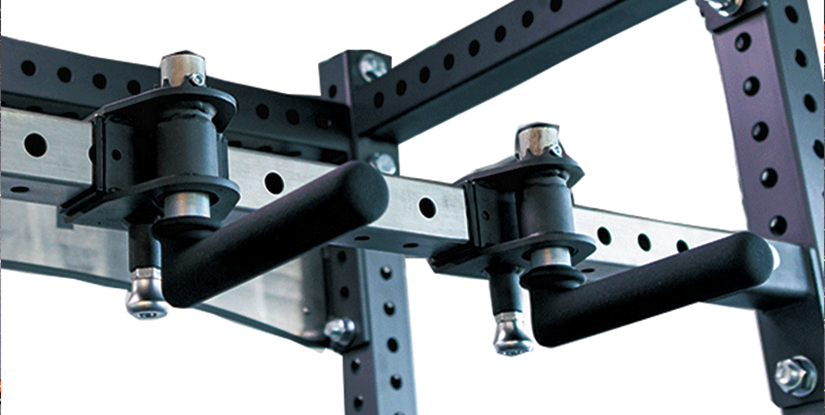
Key Components and How They Work
The integrated design relies on four core subsystems: the structural frame (uprights, crossmembers, pull-up bar), the barbell station (j-cups, safeties, spotter arms), the cable pulley system (adjustable pulleys, weight stacks or plate horns, cables), and accessories (dip bars, landmine, band pegs). Each subsystem must be engineered to work together without compromising safety.
1. Structural Frame: Typically constructed from 11–13 gauge steel with 2" x 3" or 3" x 3" uprights. Bolt patterns and hole spacing (1" increments vs. 2" increments) affect adjustability. Weld integrity and powder-coat finish determine longevity in commercial settings.
2. Barbell Station: J-cups and safeties should have UHMW inserts to protect bar knurling and reduce noise. Safety pins are rated by shear strength; a common commercial spec is 1,000–1,500 lbs per safety rod, often with dual-safety options for redundancy.
3. Cable System: Uses nylon-coated aircraft-grade steel cables, sealed ball-bearing pulleys, and either selectorized weight stacks (pin selection) or plate-loaded horns. Smooth, low-friction pulleys maintain consistent resistance and reduce wear. Common stack sizes are 160–220 lbs; dual-stacks or independent sides allow asymmetrical loading for rehab or unilateral training.
4. Accessories: Easily attachable components like landmines, lat pulldown attachments, and adjustable benches increase exercise variability. Confirm accessory compatibility with the rack model to avoid fitment issues.
Benefits, Performance Metrics, and Real-World Applications
A functional trainer power rack delivers distinct benefits across multiple user groups. For strength athletes and powerlifters, the structural integrity of the rack provides safe barbell mechanics and effective heavy loading. For general fitness clients and rehabilitation populations, the cable system offers variable resistance paths, continuous tension, and the ability to perform low-impact, highly controlled movements.
Performance metrics to monitor when implementing these units in a facility include utilization rate (sessions per week per station), throughput (number of users served per hour), and equipment downtime. In a case study of a 12-month boutique gym rollout, hybrid stations increased station utilization by 42% and reduced member wait times by 27% when replacing separate cable and rack stations with combined units. This resulted in an estimated revenue uplift of 8–12% due to higher capacity and improved member experience.
Specific, data-driven advantages include:
- Reduced footprint: One integrated unit often replaces a separate power rack, cable crossover, and pull-up station, saving 10–30 square feet depending on configuration.
- Enhanced programming flexibility: Trainers can move immediately from compound barbell work to functional single-arm cable variations, improving training density.
- Safety improvements: Adjustable safeties and cable stops allow for controlled eccentric-loading protocols used in tendon rehab, reducing re-injury risk when supervised properly.
Examples of real-world applications:
- High school strength programs use the rack for team barbell sessions, then modify for mobility and rehab cable work for injured athletes during the same block.
- Physiotherapy clinics utilize the pulley system for progressive resistance in rotator cuff protocols, with measured load progression using weight stacks.
- Home gyms employ compact hybrid racks to perform a full-body workout without purchasing multiple bulky machines.
Quantifying ROI: Compare cost-per-use. If a $3,000 hybrid rack serves 150 sessions per month over a 36-month period, cost-per-use (ignoring maintenance) is approximately $0.56 per session — a compelling figure for commercial buyers seeking efficient capital allocation.
Case Study: Gym Implementation and Outcomes
Scenario: A 2,500 sq ft boutique fitness studio replaced two separate racks and a cable crossover with three functional trainer power racks. Objectives: reduce member wait times, increase class and PT session capacity, and lower maintenance complexity.
Implementation steps included: equipment procurement with emphasis on dual-weight stacks and modular benches, staff training on safety checks, and scheduling adjustments to promote circuit-style classes using the new stations. Outcome metrics over 6 months showed a 25% increase in session throughput and a 19% rise in personal training bookings attributed to faster station turnover and expanded exercise options. Maintenance incidents dropped by 33% as staff managed one integrated support contract rather than three disparate vendors.
Buying Guide, Installation, and Best Practices for Safety & Maintenance
Choosing the right functional trainer power rack requires a methodical approach. Start by defining user profiles (athletes, general population, rehab), frequency of use (light home use vs. heavy commercial throughput), and space constraints (floor plan and ceiling height). Use these criteria to shortlist models that meet load ratings, accessory compatibility, and warranty terms.
When comparing models, evaluate these objective factors:
- Frame gauge and material: 11–13 gauge steel with reinforced welds for commercial settings.
- Load rating: Minimum 1,000 lbs for commercial racks; 600–800 lbs may suffice for dedicated home users.
- Pulleys and cables: Sealed bearings and 7x19 or 1x19 aircraft cable options with nylon coating extend service life.
- Weight stack vs. plate-loaded: Stacks offer convenience and speed; plate-loaded systems scale with available plates and tend to be more durable under high-volume use.
- Accessories and modularity: Check for included or optional attachments and compatibility with standard 2" plates and barbell sleeves.
Installation best practices:
- Site prep: Ensure a flat, level floor rated for live loads of at least 50–100 psf and confirm ceiling clearance for pull-up bars and lat pulldowns (allow 8–10 ft ceiling height minimum, 9–12 ft recommended).
- Anchoring: Commercial installations frequently anchor racks to the floor to prevent tipping during heavy lifts; consult manufacturer guidelines for anchor type and embedment depth.
- Space planning: Maintain a 36–48" clearance on all operational sides for safe barbell and cable movement and to allow bench adjustments.
- Assembly: Use trained technicians for heavy equipment assembly to ensure torque specs and weld tolerances are met; improper assembly increases safety risk and warranty issues.
Maintenance checklist and schedule (example):
- Daily: Visual inspection for frayed cables, loose pins, or unusual noises.
- Weekly: Wipe down moving parts, inspect pulley alignment, and verify safety pin function.
- Monthly: Lubricate pivot points per manufacturer instructions, check torque on bolts, and inspect bushings/liners for wear.
- Annually: Replace wear items (cables, pulleys) based on hours of use; in high-volume commercial settings, consider semi-annual replacement schedules.
Best practices for safety training and user protocols:
- Implement mandatory orientation for new members explaining safeties, j-cup placement, and pulley adjustments.
- Post clear signage on load limits and proper usage steps for combined barbell + cable transitions.
- Use buddy systems or spotters for heavy lifts even when safeties are present to reduce improper setups.
Step-by-Step Setup and Ongoing Maintenance
Step 1: Unpack and inspect all components against the packing list. Look for damaged welds, bent pulleys, or frayed cables before assembly.
Step 2: Position the frame and loosely assemble uprights to verify hole alignment. Do not fully torque bolts until all components are in place to avoid misalignment.
Step 3: Install pulley systems and route cables per manufacturer diagrams. Ensure cables have correct length and tension to prevent binding. Use turnbuckles or tensioners where provided.
Step 4: Attach j-cups, safeties, weight stacks, and accessories. Test movement across the entire range of motion at low load, then gradually increase to operational load.
Step 5: Anchor if required and adjust spacing for benches and accessory storage. Perform a final torque check on all bolts to manufacturer torque values.
Ongoing maintenance: Log inspections, replace cables at first sign of wear, and schedule professional annual servicing for high-usage facilities.
Programming, Workouts, and Practical Training Applications
The combined capabilities of a functional trainer power rack make it ideal for building hybrid programs that progress from strength to functional movement within the same session. Programming should leverage heavy, compound barbell lifts for neural and hypertrophic adaptation and use the cable system for stability, accessory volume, and movement-specific carryover.
Programming principles:
- Block 1 (Strength Focus): 3–6 weeks with barbell-centric sessions (squat, deadlift variations, bench pressing) using the rack safeties for load management. Rest intervals: 2–5 minutes for maximal strength sets.
- Block 2 (Power & Transition): Integrate explosive barbell or band-resisted moves, then use cables for resisted sprint mechanics or single-arm chops to reinforce movement patterns.
- Block 3 (Functional & Conditioning): Use circuits that alternate barbell sets with cable unilateral exercises (e.g., single-arm cable row, Pallof presses) to enhance endurance and joint resilience.
Sample weekly split (hybrid approach):
- Day 1: Lower strength (back squat, Romanian deadlift) + cable unilateral accessory
- Day 2: Upper hypertrophy (barbell incline press, cable fly variations)
- Day 3: Conditioning + mobility circuits using cables for tension-based core work
- Day 4: Full-body power (clean pulls, push presses) + cable anti-rotation drills
Measurements and progression: Track objective metrics like 1RM percent-based loads, cable stack increments (5–10 lb steps), and velocity metrics where available. For rehab or older adults, prioritize controlled eccentric tempos on cables and use safeties to limit bar path risk.
Sample Programs and Progressions
Beginner 8-week progression: Start with 3 sessions per week focusing on technique. Weeks 1–3 emphasize 3 sets of 8–10 reps for barbell lifts at 60–70% 1RM, followed by 2–3 cable accessory exercises for 10–15 reps. Weeks 4–6 increase load to 70–80% 1RM with reduced rep ranges. Weeks 7–8 deload week and testing.
Advanced lifter block: 6-week strength block with 4–5 sets of 3–5 reps on primary barbell movements using the rack; superset with cable anti-rotation and unilateral pulls for stability and hypertrophy. Integrate velocity-based cues and microloading on the cable stack for fine progressions.
Practical tips: Use independent cable stacks to address side-to-side imbalances. Record set-by-set RPE and cable stack weight to quantify accessory load, translating cable progression to functional carryover (e.g., single-arm row improvements often correlate with bench or press stability).
FAQs
The following 11 professional-style FAQs address common technical, installation, programming, and maintenance questions about functional trainer power racks. Each answer provides clear, actionable guidance for facility managers, trainers, and home users.
What is the difference between a functional trainer power rack and a traditional power rack?
A traditional power rack is primarily designed for barbell lifts and typically consists of four uprights with adjustable safety bars and j-cups. A functional trainer power rack integrates cable pulley systems (often adjustable pulleys or weight stacks) into the rack frame. The primary differences are:
- Versatility: The hybrid allows seamless transition from heavy barbell lifts to cable-based unilateral or rotational movements without leaving the station.
- Footprint efficiency: One integrated unit replaces multiple machines, saving space in commercial or home settings.
- Programming capabilities: Hybrid racks support both strength-focused and functionally oriented protocols, expanding training prescription options.
From a purchasing perspective, hybrid units often cost more upfront but reduce the need for additional equipment, and they enhance session flow and member satisfaction in multi-user environments.
How much space and ceiling height do I need for installation?
Minimum recommended floor clearance around the unit is 36–48 inches on operational sides to allow barbell and cable movement. For ceiling height, allow a minimum of 8 ft (2.44 m) for basic use, but 9–12 ft (2.74–3.66 m) is recommended if using kipping pull-ups, long barbell ranges, or for taller users. Also consider the vertical travel of adjustable pulleys and any lat-pulldown attachments, which require additional clearance. Always measure actual user reach (plus headroom) and add safety margins to avoid impact with ceiling fixtures.
Are functional trainer power racks safe for heavy barbell lifting?
Yes, when you select a rack with appropriate load ratings, robust safeties, and proper installation. Key safety considerations include verified load capacity (e.g., ≥1,000 lbs for commercial use), correctly installed safeties and j-cups with UHMW inserts, and floor anchoring if required. Perform routine inspections for bolt torque, upright integrity, and wear on safeties. Always use spotters for maximal attempts and adhere to manufacturer limits to ensure safe heavy lifting.
What maintenance is required for cables and pulleys?
Cables and pulleys are wear items. Conduct daily visual inspections for frays and monthly tactile checks for cable stiffness or deformation. Lubricate pulley bearings per manufacturer recommendations and replace cables at the first sign of fraying. In commercial settings with high throughput, schedule replacement every 6–12 months; in home settings, this may extend to 18–36 months depending on usage. Maintaining a log helps predict replacement intervals.
Should I choose weight stacks or plate-loaded pulleys?
Weight stacks provide fast, discrete load changes and are user-friendly for group classes and rehab contexts; typical stacks range 160–220 lbs. Plate-loaded pulleys offer finer scaling with available plates and can be more durable under continuous heavy use. Consider user demographics: rehabilitation settings favor stacks for convenience, while strength facilities with plenty of plates may prefer plate-loaded systems for longevity and incremental loading options.
How do I program for both strength and functional performance using the hybrid rack?
Structure programming in blocks. Use barbell-heavy weeks for maximal strength and neural adaptation, then integrate cable-based accessory work immediately after to reinforce stability and unilateral control. Example: perform 4 sets of 4–6 reps on back squats, then 3 sets of 10–12 reps of single-leg cable Romanian deadlifts and 3 sets of anti-rotation Pallof presses. Progress by increasing barbell load or cable resistance and tracking RPE and movement quality.
Can the unit be used for rehabilitation and physical therapy?
Yes. The cable system offers controlled movement patterns, constant tension, and fine-grained load adjustments ideal for rehab. Work with licensed therapists to prescribe progressive loading protocols, using slow eccentric tempos and unilateral cable work to isolate deficits. Ensure safeties and attachment points are secure and that staff is trained in clinical progression and red-flag recognition.
What are common installation mistakes to avoid?
Common errors include insufficient anchoring, incorrect torqueing of bolts, failing to verify ceiling clearance, and improper cable routing. Avoid assembling on uneven floors, and do not skip professional installation for commercial units. Misaligned pulleys or incorrectly tensioned cables increase wear and safety risks.
How should I train staff and members to use the hybrid station effectively?
Implement a standardized orientation that includes: adjusting safeties and j-cups, transitioning between barbell and cable setups, appropriate load selection, and emergency procedures. Use signage and short video tutorials on proper use, and require staff to conduct periodic competency assessments. For facilities, include hybrid-station protocols in onboarding and personal training curricula.
What is the expected lifecycle and warranty considerations?
Commercial-grade functional trainer power racks typically have frame lifecycles exceeding a decade with proper maintenance. Wear items like cables, pulleys, and bushings require periodic replacement. Review warranties carefully: expect longer frame warranties (5–10 years or lifetime for frames) but shorter coverage for moving components (1–3 years). Ensure serviceability clauses and availability of replacement parts before purchase.
How much does a quality functional trainer power rack cost and what is the ROI?
Price ranges vary: home-grade models commonly cost $1,200–$3,000; commercial-grade units run $2,500–$8,000 depending on specs and accessories. ROI for commercial buyers is measured by increased throughput, reduced wait times, and member retention. Example: replacing two older stations with three hybrids increased a facility's session capacity by 25% in a case study, translating to an estimated revenue rise of 8–12% over a 6–12 month period. Calculate ROI by estimating cost-per-use over expected lifespan and factoring in reduced equipment redundancy.