
How to Make Fitness Equipment at Home
Foundations for DIY Fitness Equipment: Safety, Planning, and Tools
Starting a DIY fitness equipment project requires a clear plan, careful material selection, and a rigorous focus on safety. Home-built gear can save money and tailor workouts to your space, but it also carries risk if loads are misjudged or materials fail under stress. This section lays the groundwork: how to assess your space, define performance goals, and assemble a toolkit that supports durable, safe builds. The aim is to create a scalable approach that works for beginners, intermediate trainees, and small home gyms alike.
First, define your workout goals. Do you want free weights, resistance training, or modular rigs for functional workouts? Your goals shape material choice and build complexity. Then evaluate your space: ceiling height, floor type, and clearance around equipment affect not only what you can build, but where you can use it safely. Finally, set a budget with a conservative contingency. Most DIY projects benefit from a staged approach: prototype a low-risk piece (like a sandbag or basic weight shell) before attempting heavier items (such as a customizable kettlebell core) to validate tolerances and handling characteristics.
Materials selection matters as much as design. Favor components with known performance in load-bearing roles: steel cores or pipes with appropriate wall thickness, robust fasteners, and impermeable coverings for grip areas. Surface finishes should resist sweat and corrosion. During planning, document tolerances, estimated load ratings, and curing times for any composite components. Visualizing load paths — where force travels from grip through core to base — helps you spot potential weak points before assembly.
Tools and safety gear commonly used in DIY gym projects include: a tape measure, level, angle grinder, drill with metal bits, locking pliers, a hydraulic press or hammer, thread taps, a soldering iron or epoxy for bonding, sandpaper or a file for finishing, and personal protective equipment such as gloves, eye protection, and a respirator for epoxy or solvent use. Create a dedicated workspace with good ventilation and a non-slip surface. Keep a small discard area for failed components to avoid rework that could compromise safety.
To maintain progress, adopt a documentation routine. Photograph each stage, log material lot numbers, track curing or set times, and maintain a simple failure log. This habit makes it easier to trace issues and adjust future builds. Finally, plan for progressive loading. Start with light tests, perform controlled drop and impact checks on padded surfaces, and never exceed the tested weight range. With these foundations, you’ll be prepared to pursue practical builds with confidence and discipline.
Space assessment and safety considerations
Before making anything, map your training area. Use a floor plan to measure length, width, and ceiling height. Key considerations include:
- Floor plan: hard floors beyond the training zone require protective mats to absorb impact and prevent slippage.
- Weight distribution: ensure the base of each device can handle dynamic loads without tipping or sinking. A wide, stable base is safer for free weights and bags.
- Anchoring and mobility: modular rigs should be anchored to walls or floors only if rated for the load. For portable pieces, verify base footprint and incorporate non-slip feet.
- Environmental safety: keep liquids away from electronics, store epoxy and solvents in a ventilated cabinet, and avoid corners where snag hazards exist.
- Usage limits: define maximum user weight, drop height, and intended exercise types to prevent unexpected failures.
Practical tip: create a small, labeled testing protocol before heavy use. For example, test a new kettlebell shell with gradually increasing loads, visually inspect for hairline cracks, and listen for unusual creaks. Document the test results and stop if any component shows signs of distress. This disciplined approach reduces the risk of injuries and equipment failure.
Budgeting and sourcing affordable materials
Budgeting effectively means balancing cost, safety, and durability. A pragmatic approach uses a mix of repurposed parts and purpose-built components. Consider the following guidelines and cost ranges based on typical DIY markets:
- Kettlebell cores: a reinforced shell paired with a grip-friendly handle can cost roughly $20–$40 in parts. Expect to spend $5–$15 on epoxy or resin and another $10–$20 on sealant or coatings.
- Sandbags and bags substitutes: burlap or heavy-duty nylon bags with interior liners cost about $10–$25 per unit, plus $5–$15 for sand or filler materials per bag depending on size.
- Hardware and fasteners: bolts, washers, and locking mechanisms run about $8–$25 per project, depending on quantity and metal grade.
- Protective coatings and grip materials: epoxy, powder coating, or grip tape typically adds $8–$20.
Pro tips to cut costs without compromising safety:
- Look for off-season sales on hardware and steel components; salvage is often safe if conditions are checked (no rust, no cracks).
- Repurpose part of an existing gym piece (e.g., a sturdy bar from an old rack) if it meets safety specs; ensure it’s disassembled and inspected before reuse.
- Join local maker or hardware co-ops; bulk purchases can reduce per-unit costs and provide access to stronger materials.
Documenting costs in a simple spreadsheet helps manage the budget, track sourcing timelines, and forecast future projects. For most beginners, start with one or two light projects (like a sandbag and a light kettlebell core) to validate processes, then scale up.
Practical builds you can complete at home: kettlebells, sandbags, and custom rigs
This section translates foundations into two practical, scalable builds that blend safety, performance, and cost efficiency. Both approaches emphasize balanced design, controlled testing, and clear maintenance plans. They’re designed to be adaptable for different spaces, from a small apartment corner to a compact garage gym.
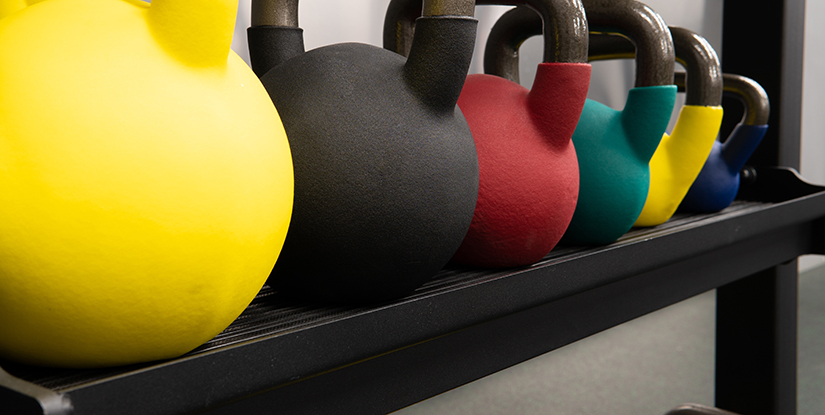
Kettlebells and free weights: materials, steps, and safety checks
- Design target: choose a practical range of weights (for example 8 kg, 12 kg, 16 kg) and aim for a symmetric center of mass. A standard handle diameter of about 35–38 mm offers a comfortable grip for most adults.
- Core construction: create a shell from a steel or thick-wall pipe that can house a robust weight core (concrete or steel plate). If using concrete, cast inside a sealed mold with a smooth interior to reduce air pockets. For steel cores, ensure the core is well-supported to prevent deformation.
- Grip and finishing: apply a grip-friendly coating (rubberized tape, vinyl grip, or powder coat). Smooth any rough edges and ensure the handle is securely bonded to the core.
- Safety checks: perform a three-stage test — dry run without load, partial-load lift, and a controlled drop onto padded flooring. Inspect for cracks, loose fittings, or balance asymmetry. If any issue is detected, pause usage and reassess before continuing.
- Maintenance: inspect monthly, reseal joints annually, and replace any worn grips or protective coatings. Store in a dry area to prevent rust, and rotate weights to verify even wear.
In practice, a DIY kettlebell system can be a cost-effective solution for a home gym, especially when you start with lighter weights and validate construction quality. A well-made core and solid handle dramatically improve feel and safety, particularly during ballistic lifts like swings or snatches. Keep workload modest and progress gradually as you confirm the durability of your build.
Sandbags, medicine ball substitutes, and portable rigs
Sandbags offer a versatile alternative to fixed weights and are particularly useful for functional training, core stability, and conditioning. To assemble a durable sandbag: choose a sturdy outer bag (vinyl or heavy-duty fabric), insert an inner liner or multiple bags for easy weight adjustment, and seal tightly. Calibrate weight using filler material such as dry sand, rice, or small pellets; ensure the final bag remains compact to prevent shifting during dynamic moves. Weigh each bag to maintain consistency across workouts, and label with target loads.
For portable rigs and anchors, consider a lightweight frame that can be secured to a wall or ceiling using rated anchors. Use anti-slip feet and short, reinforced crossbars for stability. When space is limited, prioritize multifunction pieces: a single anchor point with adjustable straps can support row, pull-down, and resistance-based exercises. Always test anchor reliability with gradual loading, and never exceed the rated capacity of the mounting hardware. Regularly inspect the fabric, stitching, and metal joints for signs of wear or fatigue.
Maintenance for sandbags and rigs focuses on durability and hygiene. Wash outer covers with mild detergent, dry completely before storage, and replace worn inner liners as needed. Keep a kill-switch plan in case a unit shows abnormal movement or instability during a workout. If you notice inconsistent performance (e.g., unexpected shifts, cracks, or loose fittings), pause and evaluate the build before resuming use.
FAQs
- Q1: Are DIY fitness machines safe for long-term use? A: When carefully designed, tested, and maintained, DIY gear can be safe. Start with light weights, document load testing, and replace any worn parts promptly. Safety should be every builder’s primary concern.
- Q2: What materials are best for DIY kettlebell cores? A: A solid metal shell with a robust interior core (concrete or a steel plate) is typical. The core should be well-sealed to prevent dust and moisture ingress and to ensure uniform weight distribution.
- Q3: How much weight can a DIY sandbag safely hold? A: It depends on fill material, outer bag strength, and seal integrity. Start with lighter loads (e.g., 10–20 kg) and test incrementally up to your target, checking seams and liners after each session.
- Q4: How do I test a new piece of equipment? A: Use a staged approach: 1) dry run with no weight, 2) light load lift, 3) controlled drop tests onto a padded surface. Inspect for cracking, deformation, and balance after each stage.
- Q5: Can DIY equipment meet weight-rating standards? A: DIY items rarely meet formal weight-rating certifications. They can be safe if designed around known stress limits and tested thoroughly, but never rely on them for supervised rehabilitation or heavy Olympic lifts without caution.
- Q6: How should I protect wooden or vinyl floors? A: Use thick anti-slip mats, thick padding under heavy items, and avoid placing heavy loads directly on wood while performing dynamic movements.
- Q7: What maintenance schedule is recommended? A: Inspect weekly for signs of wear, re-seal joints every 6–12 months, and replace grips or fabric covers annually or as needed.
- Q8: How much time does it take to build a basic kettlebell core? A: A simple core can take a few hours to a day, depending on tool access and curing times for adhesives or coatings. Plan for a small project first to master the process.
- Q9: Are there safety caveats for beginners? A: Yes. Start with minimal loads, ensure stable bases, never work near children or pets during construction or use, and always use protective gear during assembly and training.
- Q10: How do I source affordable components? A: Look for off-season sales, local hardware suppliers, or repurpose from salvage sources. Keep a list of preferred sizes and materials to streamline future projects and avoid incompatible parts.