
Complete Guide to Choosing and Using a Weight Bar and Weights Set
Comprehensive Guide to the Weight Bar and Weights Set: What to Know Before You Buy
Choosing the right weight bar and weights set is essential for safe progress, efficient workouts, and long-term value. A correct selection aligns with your goals (strength, hypertrophy, Olympic lifting), space constraints, budget, and technical needs such as bar length, load capacity, and plate compatibility. Industry trends show home-gym purchases surged sharply during 2020–2021; many lifters now prioritize durable Olympic-style equipment due to its versatility and upgrade paths.
Key specifications to evaluate include: bar length and shaft diameter, max load capacity, sleeve design and bearings, knurling pattern and placement, and plate compression or bumper construction. Typical benchmarks: a standard Olympic men's bar measures ~7 ft (2.2 m), weighs 20 kg (44 lb), and accepts 450 mm diameter plates; a women's Olympic bar generally weighs 15 kg (33 lb) with a 25 mm shaft diameter suited for smaller hands. Standard (non-Olympic) bars use 1-inch (25 mm) sleeves and plates with smaller bores; they are more common in budget or casual-use sets.
Practical selection steps (step-by-step):
- Define primary use: powerlifting, Olympic lifting, general strength, or home circuits.
- Measure available space: ensure you have enough vertical clearance (overhead lifts require ~7–8 ft) and horizontal room for bar length and plate-loaded diameter.
- Choose bar type: for heavy deadlifts and squats pick a powerlifting bar with stiffer whip; for cleans/snatches pick an Olympic bar with more whip and rotating sleeves (bearing or bushing systems).
- Select plate types: iron plates for low cost and compactness; bumper plates for dropping; calibrated plates for competition accuracy.
- Check compatibility: confirm plate bore (50 mm for Olympic plates) and collar system (spring, lockjaw, or spin-lock).
Example case study: Sarah, a busy professional, had 2.5 m² in her garage. She chose a 7 ft Olympic bar (20 kg), a set of fractional plates including 1.25 kg increments for microloading, and bumper plates for occasional drops. Total initial cost including collars and a basic power rack: $850. Within 12 months she increased her squat by 20% using progressive 2.5–5 lb increments demonstrated in her weekly training log.
Types of Bars and Plates: Match the Tool to the Task
There are several bar profiles and plate designs; each has specific real-world applications. Major bar types include:
- Olympic weightlifting bars: 20 kg (men) and 15 kg (women), rotating sleeves with bearings or bushings. Best for cleans, snatches, and dynamic lifts.
- Powerlifting bars: stiffer, more pronounced knurling, usually no center knurl. Optimized for heavy squats, benches, and deadlifts.
- Standard/utility bars: thinner sleeves (1") used with standard plates, suited to lighter loads and budget setups.
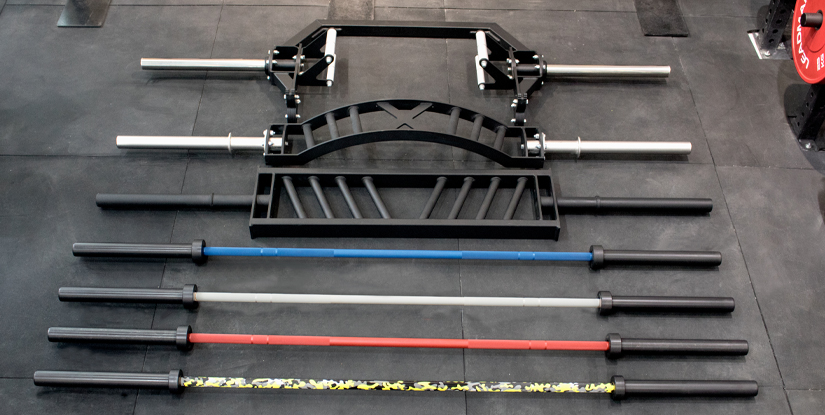
- Specialty bars: trap/hex bars, safety squat bars, Swiss bars, and curl bars each solve specific joint, range-of-motion, or technique issues.
Plate types and considerations:
- Cast iron plates: low cost, longest lifespan; compact but noisy and not ideal for repeated drops.
- Bumper plates: dense rubber, maintain bar and floor integrity when dropped; required for Olympic-style drops and CrossFit-style training.
- Technique/tech plates: thinner calibrated plates used for progression with fractional increases.
Visual element description: include a labeled diagram of bar anatomy (shaft diameter, knurling zones, sleeve, end cap), a cross-section of an Olympic plate (steel core, rubber layer, steel ring), and a dimension overlay showing typical bar lengths and plate diameters.
Buying, Maintenance, and Safety Best Practices for Your Weight Bar and Weights Set
After selecting the right equipment, follow maintenance and safety best practices to extend life and reduce injury risk. Routine care includes cleaning, lubrication, inspection, and proper storage. Statistics from various gym maintenance studies indicate that proactive maintenance reduces equipment replacement costs by up to 30% over five years. Although actual numbers vary, the principle stands: small investments in care yield significant savings.
Maintenance checklist (regular schedule):
- Weekly: wipe down bar shafts and plates after workouts with a dry cloth to remove sweat and chalk. Inspect collars and sleeve rotation.
- Monthly: apply a light coating of 3-in-1 oil or specialized bar oil to the bar sleeves and lightly to the shaft if needed (avoid over-oiling knurling). Check for rust spots and remove with fine-grade steel wool followed by light oil.
- Quarterly: inspect bearings/bushings; re-torque end caps and adjust collars. Check plates for hairline cracks or delamination in bumper plates.
- Annually: full teardown inspection for commercial gyms; replace worn collars, bushings, or damaged plates.
Safety best practices when loading and using a weight bar and weights set:
- Always use collars; they prevent plates from sliding and shifting load balance—especially important for explosive lifts.
- Load plates symmetrically and confirm total weight before lifting—use labeled plates and keep a calculator or app to sum weights quickly (e.g., bar 20 kg + two 10 kg + two 2.5 kg = 45 kg).
- Use spotters or safety pins when lifting near maximal loads, and practice progressive warm-up sets to reduce acute injury risk.
- For dropped lifts, use bumper plates and an appropriate platform area with shock-absorbing flooring (20–25 mm thick rubber tiles commonly recommended).
Case study: a community gym instituted a monthly inspection routine and saw a 40% reduction in bar sleeve failures over two years due to early detection and turning bearings replacement into scheduled maintenance instead of emergency repairs.
Step-by-Step: Setting Up and Programming with a Weight Bar and Weights Set
Practical programming begins with baseline testing and a plan for progressive overload. Below is a step-by-step 12-week beginner-friendly program structure using a weight bar and weights set. The example uses kilograms for clarity and fractional plates for microprogression.
- Week 0 — Baseline: Test 5-rep max (5RM) for squat, bench, and deadlift with proper warm-up (2–3 progressive warm-up sets).
- Weeks 1–4 — Volume Phase: 3 workouts per week. Main lift: 3 sets of 8 reps at 70% 5RM; accessory movements: 3 sets of 10–12 reps. Increase load by 2.5–5% each week if all reps are completed with good technique.
- Weeks 5–8 — Intensity Phase: 3 workouts per week. Main lift: 5 sets of 5 reps at 80% 5RM; use 1.25–2.5 kg plates for gradual increases. Monitor bar whip and sleeve rotation to ensure safe handling under heavier loads.
- Weeks 9–12 — Peak and Test: Taper accessory volume, increase doubles/triples at 85–90% for specificity, retest 5RM in week 12.
Actionable tips: keep small fractional plates (0.5–2.5 kg) for microloading, log every session with exact plate combinations, and always confirm plate compatibility (Olympic 50 mm sleeves vs 1" standard sleeves). Visual cue: maintain a laminated chart near your rack showing common plate combinations for quick weight assembly (e.g., 20 kg bar + 20 kg = 60 kg; visual images of plate stacks help beginners).
Purchase Guide, Cost Breakdown, Space Planning, and Accessories for a Weight Bar and Weights Set
Budgeting for a weight bar and weights set varies widely. Typical price ranges (approximate, consumer market as of 2024):
- Entry-level standard bar + basic iron plate set: $100–$300.
- Mid-range Olympic bar with bushing sleeves + cast/iron plates: $300–$700.
- High-end Olympic bar with needle bearings + calibrated or bumper plates: $700–$2,500+.
When calculating costs, include essential accessories: collars ($15–$50 per pair depending on quality), rack or squat stand ($150–$800), rubber flooring ($30–$80 per square meter), and storage like plate trees or bar holders. Buying used can save 30–50% but inspect for bent shafts, compromised sleeves, or cracked bumper plates.
Space planning checklist:
- Measure vertical clearance: at least 7–8 ft for overhead lifts; add extra clearance for platform height.
- Allocate a clear floor area: a 2.4 m x 2.4 m (8' x 8') zone recommended for safe bar path and plate storage.
- Plan for rack placement so the loaded bar does not strike walls; allow 0.6–1 m clearance behind the lifter for bar path variations.
Compatibility and buying checklist:
- Confirm plate bore: Olympic plates typically 50 mm (2"), standard plates ~25 mm (1").
- Check bar sleeve length and maximum load rating (e.g., 500–700 kg commercial bars; 300–600 lb consumer bars).
- Evaluate warranty and part replaceability: can you buy replacement sleeves, collars, or bearings?
Real-world application example: a CrossFit box opted for bumper plates and high-speed needle-bearing bars to support frequent drops and fast rotational movements. A private home gym focused on a single quality Olympic bar and calibrated iron plates to save space and permit progressive strength phases.
Maintenance and Upgrading: When to Replace or Add Accessories
Knowing when to replace or upgrade components improves safety and performance. Replace a bar if you notice bent shafts, excessive wobble in sleeves, or compromised knurling that threatens grip. Replace plates if cracks, core delamination, or persistent flat spots appear on bumper plates. Typical timelines: consumer bars can last 5–15 years with proper care; commercial-grade bars often exceed 10–20 years depending on use.
Upgrade paths based on goals:
- From generalist to lifter focused: move from a multi-purpose Olympic bar to a specialized powerlifting or Olympic competition bar.
- From basic iron to dynamic training: add bumper plates and a lifting platform to safely drop weights and train power movements.
- Incremental load increments: acquire fractional plates (0.5–2.5 kg) to ensure steady microprogression.
Accessories to consider: magnetic or spring-lock collars for fast changes, landmine attachments for rotational strength, dip handles for bodyweight work, and a calibrated scale or sticker set so coaches can quickly verify plate accuracy. Visual accessory layout suggestion: a plate tree beside the rack and horizontal bar holders mounted to wall to reduce clutter and trip hazards.
FAQs
Q1: What is the difference between an Olympic bar and a standard bar? A1: Olympic bars have 50 mm sleeves and typically weigh 20 kg (men) or 15 kg (women), while standard bars use ~25 mm sleeves and smaller-bore plates. Olympic bars support heavier loads and rotating sleeves ideal for dynamic lifts.
Q2: How much should I spend on a reliable weight bar and weights set? A2: Expect $300–$700 for a quality mid-range Olympic set; budget under $300 for entry-level options and $700+ for professional-caliber gear.
Q3: Can I mix standard plates with an Olympic bar? A3: No — plate bores differ. Standard plates (1") will not fit 2" Olympic sleeves without adapters; use matching bore sizes for safety.
Q4: How often should I service the bar sleeves? A4: Inspect monthly and service bearings/bushings quarterly for average use; more frequently in commercial environments.
Q5: Are bumper plates necessary for home use? A5: If you perform drops or Olympic lifts, yes. Otherwise, cast iron plates suffice for static lifts like squats and benches.
Q6: What is ‘knurling’ and how important is it? A6: Knurling is the textured pattern on the shaft that improves grip. Choose knurling aggressiveness based on comfort and training needs; aggressive knurling aids heavy lifts but may abrade skin.
Q7: How do I calculate total load quickly? A7: Total = bar weight + sum of both sides of loaded plates. Use a laminated chart or phone app for fast reference.
Q8: What are the signs a bar should be replaced? A8: Bent shaft, loose or wobbly sleeves, broken end caps, and worn-away knurling that impairs grip indicate replacement.
Q9: Can I use my bar for both powerlifting and Olympic lifting? A9: Yes for general training, but each discipline benefits from a specialized bar (stiffness and whip differences). Many lifters use one multi-purpose bar initially.
Q10: How do I prevent rust on my bar? A10: Keep bars dry, wipe after use, store inside, and apply light oil periodically. Use rust-removal techniques on light rust immediately.
Q11: What collars should I use? A11: For heavy or dynamic lifts, use positive-lock collars (lockjaw or spring collars). For quick loading in group classes, lever collars are efficient and secure.
Q12: How much space do I need for a safe setup? A12: A clear 2.4 m x 2.4 m area with 7–8 ft ceiling clearance is a practical minimum for most lifting activities. Ensure extra clearance around racks for spotters and plate storage.